Preview of Memory and Variable Management
Assign values to a variety of variable data types. Use the VAR-LINK screen to view a list of the defined variables. Then move a variable to the user data archive memory and explore the ways in which you can and cannot access an archived variable. (Archived variables are locked automatically.) Finally, unarchive the variable and delete the unused variables so that they will not take up memory.
| Steps | TI-89 Keystrokes | TI-92 Plus Keystrokes | Display |
|---|---|---|---|
| 1. From the Home screen, assign variables with the following variable types.Expression: 5 → x1Function: x² +4 → f(x)List: {5,10} → l1Matrix: [30,25] → m1 | [HOME] [CLEAR]5 [STO▶] X 1[ENTER]X [^] 2 [+] 4 [STO▶][alpha] F [(] X [)][ENTER][2nd] [{] 5 [,] 1 0[2nd] [}] [STO▶][alpha] L 1 [ENTER][2nd] [[ ] 3 0 [,] 2 5[2nd] [ ] ] [STO▶][alpha] M 1 [ENTER] | ◆ [HOME] [CLEAR]5 [STO▶] X 1[ENTER]X [^] 2 [+] 4 [STO▶]F [(] X [)][ENTER][2nd] [{] 5 [,] 1 0[2nd] [}] [STO▶]L 1 [ENTER][2nd] [[ ] 3 0 [,] 2 5[2nd] [ ] ] [STO▶]M 1 [ENTER] | |
| 2. Suppose you start to perform an operation using a function variable but can’t remember its name. | 5 [×] | 5 [×] | |
| 3. Display the VAR-LINK screen.This example assumes that the variables assigned above are the only ones defined. | [2nd] [VAR-LINK] | [2nd] [VAR-LINK] | |
| 4. Change the screen’s view to show only function variables.Although this may not seem particularly useful in an example with four variables, consider how useful it could be if there were many variables of all different types. | [F2] [▶] [▼] [▶] 5[ENTER] | [F2] [▶] [▼] [▶] 5[ENTER] |
350 Chapter 21: Memory and Variable Management

| Steps | TI-89 Keystrokes | TI-92 Plus Keystrokes | Display |
|---|---|---|---|
| 5. Highlight the f function variable, and view its contents.Notice that the function was assigned using f(x) but is listed as f on the screen. | ◀ 2nd [F6] | ◀ F6 | x^2+4 |
| 6. Close the Contents window. | ESC | ESC | |
| 7. With the f variable still highlighted, close VAR-LINK and paste the variable name to the entry line. | ENTER | ENTER | 5* f( |
| 8. Complete the operation. | 2 ▶ ENTER | 2 ▶ ENTER | 5* f(2) |
| Archiving a variable: | |||
| 9. Redisplay VAR-LINK, and highlight the variable you want to archive.The previous change in view is no longer in effect. The screen lists all defined variables. | 2nd [VAR-LINK](use ◀ to highlight x1) | 2nd [VAR-LINK](use ◀ to highlight x1) | |
| 10. Use the F1 Manage toolbar menu F1 8 to archive the variable. | F1 8 | F1 8 | |
| 11. Return to the Home screen and use the archived variable in a calculation. | HOME6 × X 1 ENTER | ◆ [HOME]6 × X 1 ENTER | |
| 12. Attempt to store a different value to the archived variable. | 1 0 STO▶ X 1ENTER | 1 0 STO▶ X 1ENTER | |
| 13. Cancel the error message. | ESC | ESC |
Chapter 21: Memory and Variable Management 351

| Steps | TI-89 Keystrokes | TI-92 Plus Keystrokes | Display |
|---|---|---|---|
| 14. Use VAR-LINK to unarchive the variable. | \boxed2nd [VAR-LINK] (use \odot to highlight x1) \boxedF1 9 | \boxed2nd [VAR-LINK] (use \odot to highlight x1) \boxedF1 9 | |
| 15. Return to the Home screen and store a different value to the unarchived variable. | \boxedHOME \boxedENTER | \boxed\diamondsuit [HOME] \boxedENTER |
Deleting variables:
- Display VAR-LINK, and use the \boxedF5 All toolbar menu to select all variables.
A ✓ mark indicates items that are selected. Notice that this also selected the MAIN folder.
Note: Instead of using \boxedF5 (if you don't want to delete all your variables), you can select individual variables. Highlight each variable to delete and press \boxedF4.
For information about deleting individual variables, refer to page 357.
| \boxed2nd [VAR-LINK] \boxedF5 1 | \boxed2nd [VAR-LINK] \boxedF5 1 | 17. Use \boxedF1 to delete.
Note: You can press \boxed- (instead of \boxedF1 1) to delete the marked variables.
| \boxedF1 1 | \boxedF1 1 | 18. Confirm the deletion. | \boxedENTER | \boxedENTER | 19. Because \boxedF5 1 also selected the MAIN folder, an error message states that you cannot delete the MAIN folder. Acknowledge the message.
When VAR-LINK is redisplayed, the deleted variables are not listed.
| \boxedENTER | \boxedENTER | 20. Close VAR-LINK and return to the current application (Home screen in this example).
When you use \boxedESC (instead of \boxedENTER ) to close VAR-LINK, the highlighted name is not pasted to the entry line.
| \boxedESC | \boxedESC |
352 Chapter 21: Memory and Variable Management

Checking and Resetting Memory
The MEMORY screen shows the amount of memory (in bytes) used by all variables in each data type, regardless of whether the variables are stored in RAM or the user data archive. You can also use this screen to reset the memory.
Displaying the MEMORY Screen
Tip: To display the size of individual variables and determine if they are in the user data archive, use the VAR-LINK screen.
Press [2nd] [MEM].

Includes programs written for the TI-89 / TI-92 Plus as well as any assembly-language programs you have loaded
To close the screen, press [ENTER]. To reset the memory, use the following procedure.
Resetting the Memory
Important: To delete individual (instead of all) variables, use VAR-LINK as described on page 357.
From the MEMORY screen:
- Press [F1].
- Select the applicable item.

| Item | Description |
|---|---|
| RAM | 1:All RAM: Resetting RAM erases all data and programs from RAM. |
| 2:Default: Resets all system variables and modes to their original factory settings. This does not affect any user-defined variables, functions, or folders. | |
| Flash ROM | 1:Archive: Resetting Archive erases all data and programs from Flash ROM. |
| 2:Flash Apps: Resetting Flash Apps erases all Flash applications from Flash ROM. | |
| 3:Both: Resetting both erases all data, programs, and Flash applications from Flash ROM. | |
| All Memory | Resetting will delete all data, programs, and Flash applications from RAM and Flash ROM. |
Tip: To cancel the reset, press [ESC] instead of [ENTER].
- When prompted for confirmation, press [ENTER]. The TI-89 / TI-92 Plus displays a message when the reset is complete.
- Press [ENTER] to acknowledge the message.
Chapter 21: Memory and Variable Management 353
Flash ROM free on the MEMORY Screen
Note: For TI-92 Plus Modules and some TI-89 users, their maximum archive space is about 384-KB regardless of how much free Flash ROM is available.
The Flash ROM free displayed on the Memory screen [2nd] [MEM] is shared by archive and Flash applications. This Flash ROM is divided into sectors of 64-KB memory. Each individual sector can contain either archive or Flash applications, but not both. Therefore, the actual maximum available space for archive or Flash applications can be less than the total Flash ROM free shown on the memory screen.
 Shows Flash ROM free

354 Chapter 21: Memory and Variable Management
Displaying the VAR-LINK Screen
The VAR-LINK screen lists the variables and folders that are currently defined. After displaying the screen, you can manipulate the variables and/or folders as described later in this chapter.
Displaying the VAR-LINK Screen
Press [2nd] [VAR-LINK]. By default, the VAR-LINK screen lists all user-defined variables in all folders and with all data types.

Note: For information about using folders, refer to Chapter 5.
| This... | Indicates this... |
|---|---|
| [F3] Link | Lets you transmit variables and Flash applications between units and update the product software in your TI-89 / TI-92 Plus. Refer to Chapter 22. |
| ▶ | Collapsed folder view. |
| ▼ | Expanded folder view (to right of folder name). |
| ⌄ | You can scroll for more variables and/or folders. |
| ✓ | If selected with [F4]. |
| 🔒 | Locked |
| ✖ | Archived |
To scroll through the list:
- Press ⌄ or ▶. (Use [2nd] ⌄ or [2nd] ▶ to scroll one page at a time.) — or —
- Type a letter. If there are any variable names that start with that letter, the cursor moves to highlight the first of those variable names.
Tip: Type a letter repeatedly to cycle through the names that start with that letter.
Variable Types as Listed on VAR-LINK
| Type | Description |
|---|---|
| ASM | Assembly-language program |
| DATA | Data |
| EXPR | Expression (includes numeric values) |
| FUNC | Function |
| GDB | Graph database |
| LIST | List |
| MAT | Matrix |
| PIC | Picture of a graph |
| PRGM | Program |
| STR | String |
| TEXT | Text Editor session |
Chapter 21: Memory and Variable Management 355
Listing Only a Specified Folder and/or Variable Type, or Flash application
Tip: To cancel a menu, press [ESC].
Tip: To list system variables (window variables, etc.), select 3:System.
If you have a lot of variables and/or folders, or Flash applications, it may be difficult to locate a particular variable. By changing VAR-LINK’s view, you can specify the information you want to see.
From the VAR-LINK screen:
-
Press [F2] View.
-
Highlight the setting you want to change, and press □. This displays a menu of valid choices.
View — Allows you to choose variables, Flash applications, or system variables to view.
Folder — Always lists 1:All and 2:main, but lists other folders only if you have created them.
Var Type — Lists the valid variable types.

↓ indicates that you can scroll for additional variable types.
- Select the new setting.
- When you are back on the VAR-LINK VIEW screen, press [ENTER].
The VAR-LINK screen is updated to show only the specified folder, and/or variable type, or Flash application.
Closing the VAR-LINK Screen
Tip: For more information on using the [ENTER] paste feature, refer to page 359.
To close the VAR-LINK screen and return to the current application, use [ENTER] or [ESC] as described below.
| Press: | To: |
|---|---|
| [ENTER] | Paste the highlighted variable or folder name to the cursor location in the current application. |
| [ESC] | Return to the current application without pasting the highlighted name. |
356 Chapter 21: Memory and Variable Management

Manipulating Variables and Folders with VAR-LINK
On the VAR-LINK screen, you can show the contents of a variable. You can also select one or more listed items and manipulate them by using the operations in this section.
Showing the Contents of a Variable
Note: You cannot edit the contents from this screen.
You can show all variable types except ASM, DATA, or GDB. For example, you must open a DATA variable in the Data/Matrix Editor.
- On VAR-LINK, move the cursor to highlight the variable.
- Press: TI-89: [2nd] [F6] TI-92 Plus: [F6] If you highlight a folder, the screen shows the number of variables in that folder.
- To return to VAR-LINK, press any key.
Selecting Items from the List
Note: If you use [F4] to ✓ one or more items and then highlight a different item, the following operations affect only the ✓'ed items.
Tip: Press either ◀ ▶ to toggle between expand or collapse view when you have a folder highlighted.
For other operations, select one or more variables and/or folders.
| To select: | Do this: |
|---|---|
| A single variable or folder | Move the cursor to highlight the item. |
| A group of variables or folders | Highlight each item and press [F4]. A ✓ is displayed to the left of each selected item. (If you select a folder, all variables in that folder are selected.) Use [F4] to select or deselect an item. |
| All folders and all variables | Expand the folder ▶, press [F5] All and select 1:Select All. |
| Selecting 4:Expand All or 5:Collapse All will expand or collapse your folders or Flash applications. | Selects the last set of items transmitted to your unit during the current VAR-LINK session. Refer to Chapter 22. |
Deleting Variables or Folders
Tip: When you use [F4] to select an expanded folder, its variables are selected automatically so that you can delete the folder and its variables at the same time.
To delete a folder, you must delete all of the variables in that folder. However, you cannot delete the MAIN folder even if it is empty.
- On VAR-LINK, select the variables and/or folders.
- Press [F1] Manage and select 1:Delete. (You can press ← instead of [F1] 1.)
- To confirm the deletion, press [ENTER].

Chapter 21: Memory and Variable Management 357


For information about using folders, refer to Chapter 5.
Creating a New Folder
- On VAR-LINK, press \boxedF1 Manage and select 5:Create Folder.
- Type a unique name, and press \boxedENTER twice.
Copying or Moving Variables from One Folder to Another
You must have at least one folder other than MAIN. You cannot use VAR-LINK to copy variables within the same folder.
- On VAR-LINK, select the variables.
- Press \boxedF1 Manage and select 2:Copy or 4:Move.
- Select the destination folder.
- Press \boxedENTER.
The copied or moved variables retain their original names.
Tip: To copy a variable to a different name in the same folder, use \boxedSTO (such as a1\rightarrowa2) or the CopyVar command from the Home screen.
Renaming Variables or Folders
Remember, if you use \boxedF4 to select a folder, the variables in that folder are selected automatically. As necessary, use \boxedF4 to deselect individual variables.
- On VAR-LINK, select the variables and/or folders.
- Press \boxedF1 Manage and select 3:Rename.
- Type a unique name, and press \boxedENTER twice.
If you selected multiple items, you are prompted to enter a new name for each one.
Locking or Unlocking Variables Folders, or Flash Applications
When a variable is locked, you cannot delete, rename, or store to it. However, you can copy, move, or display its contents. When a folder is locked, you can manipulate the variables in the folder (assuming the variables are not locked), but you cannot delete the folder. When a Flash application is locked, you cannot delete it.
- On VAR-LINK, select the variables and/or folders, or Flash application.
- Press \boxedF1 Manage and select 6:Lock or 7:UnLock.
indicates a locked variable, folder, or Flash application in
indicates an archived variable, which is locked automatically.
358 Chapter 21: Memory and Variable Management


Pasting a Variable Name to an Application
Suppose you are typing an expression on the Home screen and can't remember which variable to use. You can display the VAR-LINK screen, select a variable from the list, and paste that variable name directly onto the Home screen's entry line.
Which Applications Can You Use?
From the following applications, you can paste a variable name to the current cursor location.
- Home screen, Y= Editor, Table Editor, or Data/Matrix Editor — The cursor must be on the entry line.
- Text Editor, Window Editor, Numeric Solver, or Program Editor — The cursor can be anywhere on the screen.
Procedure
Starting from an application listed above:
- Position the cursor where you want to insert the variable name. sin(
- Press [2nd] [VAR-LINK].
- Highlight the applicable variable.
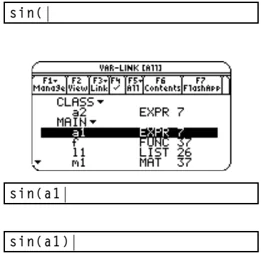
- Press [ENTER] to paste the variable name. sin(a1)
- Finish typing the expression. sin(a1)
Note: You can also highlight and paste folder names.
Note: This pastes the variable's name, not its contents. Use [2nd] [RCL], instead of [2nd] [VAR-LINK], to recall a variable's contents.
If you paste a variable name that is not in the current folder, the variable's pathname is pasted.
sin(class\a2)
Assuming that CLASS is not the current folder, this is pasted if you highlight the a2 variable in CLASS.
Chapter 21: Memory and Variable Management 359

Archiving and Unarchiving a Variable
To archive or unarchive one or more variables interactively, use the VAR-LINK screen. You can also perform these operations from the Home screen or a program.
Why Would You Want to Archive a Variable?
The user data archive lets you:
- Store data, programs, or any other variables to a safe location where they cannot be edited or deleted inadvertently.
- Create additional free RAM by archiving variables. For example:
- You can archive variables that you need to access but do not need to edit or change, or variables that you are not using currently but need to retain for future use.
- If you acquire additional programs for your TI-89 / TI-92 Plus, particularly if they are large, you may need to create additional free RAM before you can install those programs.
Additional free RAM can improve performance times for certain types of calculations.
Note: You cannot archive variables with reserved names or system variables.
Checking for Available Space
Before archiving or unarchiving variables, particularly those with a large byte size (such as large programs):
- Use the VAR-LINK screen to find the size of the variable.
- Use the MEMORY screen to see if there is enough free space.
Note: If there is not enough space, unarchive or delete variables as necessary.
\begin{tabular}{ll} For an: & Sizes must be such that: \ Archive & Archive free size > variable size \ Unarchive & RAM free size > variable size \ \end{tabular}
Even if there appears to be enough free space, you may see a Garbage Collection message (page 362) when you attempt to archive a variable. Depending on the usability of empty blocks in the user data archive, you may need to unarchive existing variables to create more free space.
360 Chapter 21: Memory and Variable Management
From the VAR-LINK Screen
Tip: To select a single variable, highlight it. To select multiple variables, highlight each variable and press F4 ✓.
To archive or unarchive:
- Press \boxed2nd [VAR-LINK] to display the VAR-LINK screen.
- Select one or more variables, which can be in different folders. (You can select an entire folder by selecting the folder name.)
- Press F1 and select either:
- 8:Archive Variable
- – or –
- 9:Unarchive Variable
Note: If you get a Garbage Collection message, refer to page 362.
If you select 8:Archive Variable, the variables are moved to the user data archive.
Note: An archived variable is locked automatically. You can access the variable, but you cannot edit or delete it. Refer to page 364.
You can access an archived variable just as you would any locked variable. For all purposes, an archived variable is still in its original folder; it is simply stored in the user data archive instead of RAM.
From the Home Screen or a Program
Use the Archive and Unarchiv commands (Appendix A).
Archive variable1, variable2, ...
Unarchiv variable1, variable2, ...
Chapter 21: Memory and Variable Management 361

If a Garbage Collection Message Is Displayed
If you use the user data archive extensively, you may see a Garbage Collection message. This occurs if you try to archive a variable when there is not enough free archive memory. However, the TI-89 / TI-92 Plus will attempt to rearrange the archived variables to make additional room.
Responding to the Garbage Collection Message
When you see the message to the right:
- To continue archiving, press
ENTER. – or – - To cancel, press
ESC.
After garbage collection, depending on how much additional space is freed, the variable may or may not be archived. If not, you can unarchive some variables and try again.
Why not Perform Garbage Collection Automatically, without a Message?
The message:
- Lets you know why an archive will take longer than usual. It also alerts you that the archive may fail if there is not enough memory.
- Can alert you when a program is caught in a loop that repetitively fills the user data archive. Cancel the archive and investigate the reason.
Why Is Garbage Collection Necessary?
The user data archive is divided into sectors. When you first begin archiving, variables are stored consecutively in sector 1. This continues to the end of the sector. If there is not enough space left in the sector, the next variable is stored at the beginning of the next sector. Typically, this leaves an empty block at the end of the previous sector.
Note: An archived variable is stored in a continuous block within a single sector; it cannot cross a sector boundary.
Each variable that you archive is stored in the first empty block large enough to hold it.
This process continues to the end of the last sector. Depending on the size of individual variables, the empty blocks may account for a significant amount of space.
Note: Garbage collection occurs when the variable you are archiving is larger than any empty block.
362 Chapter 21: Memory and Variable Management


How Unarchiving a Variable Affects the Process
When you unarchive a variable, it is copied to RAM but is not actually deleted from the user data archive memory.
 variable A Sector 1
After you unarchive variables B and C, they continue to take up space.
Sector 2
variable D Sector 3
Unarchived variables are “marked for deletion,” meaning they will be deleted during the next garbage collection.
If the MEMORY Screen Shows Enough Free Space
Even if the MEMORY screen shows enough free space to archive a variable, you may still get a Garbage Collection message.
F4+ MEMORY RESET Expr 6 Text 3887 List 404 GDB 13% Matrix 6494 Data 2880 Function 23 Other 0 Prgrm/Mem 1040 History 25 Picture 5087 System 65534 String 723 FlashRw 451588 Archive 18246 Enter=OK RAM Free 15634KB Flash MEM Free 22562B
Shows free space that will be available after all "marked for deletion" variables are deleted.
When you unarchive a variable, the Archive free amount increases immediately, but the space is not actually available until after the next garbage collection.
If the RAM free amount shows enough available space for your variable, however, there probably will be enough space to archive it after garbage collection (depending on the usability of any empty blocks).
The Garbage Collection Process
The garbage collection process:
- Deletes unarchived variables from the user data archive.
- Rearranges the remaining variables into consecutive blocks.
variable A Sector 1 variable D Sector 2
Chapter 21: Memory and Variable Management 363
Memory Error When Accessing an Archived Variable
An archived variable is treated the same as a locked variable. You can access the variable, but you cannot edit or delete it. In some cases, however, you may get a Memory Error when you try to access an archived variable.
What Causes the Memory Error?
The Memory Error message is displayed if there is not enough free RAM to access the archived variable. This may cause you to ask, "If the variable is in the user data archive, why does it matter how much RAM is available?" The answer is that the following operations can be performed only if a variable is in RAM.
Note: As described below, a temporary copy lets you open or execute an archived variable. However, you cannot save any changes to the variable.
- Opening a text variable in the Text Editor.
- Opening a data variable, list, or matrix in the Data/Matrix Editor.
- Opening a program or function in the Program Editor.
- Running a program or referring to a function.
So that you don't have to unarchive variables unnecessarily, the TI-89 / TI-92 Plus performs a "behind-the scenes" copy. For example, if you run a program that is in the user data archive, the TI-89 / TI-92 Plus:
- Copies the program to RAM.
- Runs the program.
- Deletes the copy from RAM when the program is finished.
The error message is displayed if there is not enough free RAM for the temporary copy.
Note: Except for programs and functions, referring to an archived variable does not copy it. If variable ab is archived, it is not copied if you perform 6*ab.
Correcting the Error
To free up enough RAM to access the variable:
- Use the VAR-LINK screen ( [2nd] [VAR-LINK] ) to determine the size of the archived variable that you want to access.
- Use the MEMORY screen ( [2nd] [MEM] ) to check the RAM free size.
- Free up the needed amount of memory by:
- Deleting unnecessary variables from RAM.
- Archiving large variables or programs (moving them from RAM to the user data archive).
Note: Typically, the RAM free size must be larger than the archived variable.
364 Chapter 21: Memory and Variable Management
Linking and Upgrading
22
- Linking Two Units ........ 366
- Transmitting Variables, Flash Applications, and Folders ........ 367
- Transmitting Variables under Program Control ........ 371
- Upgrading Product Software (Base Code) ........ 373
- Collecting and Transmitting ID Lists ........ 378
- Compatibility between a TI-89, TI-92 Plus, and TI-92 ........ 380
This chapter describes how to use the VAR-LINK screen to:
- Transmit variables, Flash applications, and folders between two units
- Upgrade the product software (base code)
- Collect ID Lists
It also includes information on transmitting variables under program control, and calculator compatibility.
Variables include programs, functions, graph figures, etc.
The VAR-LINK screen displays a list of defined variables, Flash applications, and folders. For information about using folders, refer to Chapter 5.

Chapter 22: Linking and Upgrading 365

Linking Two Units
The TI-89 and the TI-92 Plus each come with a cable that lets you link two units. Once connected, you can transmit information between two units.
Connecting before Sending or Receiving
Using firm pressure, insert one end of the cable into the I/O port of each unit. Either unit can send or receive, depending on how you set them up from the VAR-LINK screen.
This shows how to link two TI-89 units together:

Note: You can link a TI-89 or TI-92 Plus to another TI-89, a TI-92 Plus, or a TI-92, but not to a graphing calculator such as a TI-81, TI-82, TI-83, TI-83 Plus, TI-85, or TI-86.
This shows how to link two TI-92 Plus units together:

You can also use the unit-to-unit cable that came with your calculator to link a TI-89 and a TI-92 Plus together.

366 Chapter 22: Linking and Upgrading
Transmitting Variables, Flash Applications, and Folders
Transmitting variables is a convenient way to share any variable listed on the VAR-LINK screen — functions, programs, etc. You can also transmit Flash applications and folders.
Setting Up the Units
Most Flash applications will transfer only from a TI-89 to a TI-89 or from a TI-92 Plus to a TI-92 Plus. You cannot send Flash applications to a TI-92 unless it contains a Plus module and Advanced Mathematics 2.x product software (base code). For more calculator compatibility information, refer to page 380.
- Link two units as described on page 366.
- On the sending unit, press 2nd [VAR-LINK] to display the VAR-LINK screen.
- On the sending unit, select the variables, folders, or Flash applications you want to send. Collapsed folders become expanded when selected.
- To select a single variable or Flash application, move the cursor to highlight it.
- To select a single folder, highlight it and press F4 to place a checkmark (✓) beside it. This selects the folder and its contents.
- To select multiple variables, Flash applications, or folders highlight each one and press F4 to place a checkmark (✓) beside it.
- To select all variables, Flash applications, or folders use F5 All 1:Select All.
Note: Use F4 to select multiple variables, Flash applications, or folders. Use F4 again to deselect any that you do not want to transmit.
- On the receiving unit, press 2nd [VAR-LINK] to display the VAR-LINK screen. (The sending unit remains on the VAR-LINK screen.)
- On both the receiving and the sending unit, press F3 Link to display the menu options.
- On the receiving unit, select 2:Receive.
The message VAR-LINK: WAITING TO RECEIVE and the BUSY indicator are displayed in the status line of the receiving unit.
- On the sending unit, select either:
- 1:Send to TI-89/92 Plus — or —
- 3:Send to TI-92
This starts the transmission.
During transmission, a progress bar is displayed in the status line of the receiving unit. When transmission is complete, the VAR-LINK screen is updated on the receiving unit.
Chapter 22: Linking and Upgrading 367
Rules for Transmitting Variables, Flash Applications, or Folders
Unlocked and unarchived variables having the same name on both the sending and receiving units will be overwritten from the sending unit.
Locked and archived variables having the same name on both the sending and receiving units must be unlocked or unarchived on the receiving unit before they can be overwritten from the sending unit.
You can lock, but you cannot archive a Flash application or a folder.
| If you select: | What happens: |
|---|---|
| Unlocked variable | The variable is transmitted to the current folder and it remains unlocked on the receiving unit. |
| Locked variable | The variable is transmitted to the current folder and it remains locked on the receiving unit. |
| Archived variable | The variable is transmitted to the current folder and it remains archived on the receiving unit. |
| Unlocked Flash application | If the receiving unit has the correct certification, the Flash application is transmitted. It remains unlocked on the receiving unit. |
| Locked Flash application | If the receiving unit has the correct certification, the Flash application is transmitted. It remains locked on the receiving unit. |
| Unlocked Folder | The folder and its selected contents are transmitted. The folder remains unlocked on the receiving unit. |
| Locked Folder | The folder and its selected contents are transmitted. The folder becomes unlocked on the receiving unit. |
Note: You cannot send an archived variable to a TI-92. You must unarchive it first.
Note: You must expand a folder before transmitting it or its contents.
Canceling a Transmission
From either the sending or receiving unit:
- Press [ON]. An error message is displayed.
- Press [ESC] or [ENTER].

368 Chapter 22: Linking and Upgrading
Common Error and Notification Messages
\begin{tabular}{p{0.18\textwidth} p{0.78\textwidth}} \textbf{Shown on:} & \textbf{Message and Description:} \ \hline Sending unit & \newline This is displayed after several seconds if: \newline \quad \bullet A cable is not attached to the sending unit's I/O port. \newline \quad — or — \newline \quad \bullet A receiving unit is not attached to the other end of the cable. \newline \quad — or — \newline \quad \bullet The receiving unit is not set up to receive. \newline Press ESC or ENTER to cancel the transmission. \ & Note: The sending unit may not always display this message. Instead, it may remain BUSY until you cancel the transmission. \ Sending unit & \newline The receiving unit does not have the correct certification for the product software (base code) or Flash application being sent. \ Receiving unit & New Name is active only if you change Overwrite to NO. \newline The receiving unit has a variable with the same name as the specified variable being sent. \newline \quad \bullet To overwrite the existing variable, press ENTER. (By default, Overwrite = YES.) \newline \quad \bullet To store the variable to a different name, set Overwrite = NO. In the New Name input box, type a variable name that does not exist in the receiving unit. Then press ENTER twice. \newline \quad \bullet To skip this variable and continue with the next one, set Overwrite = SKIP and press ENTER. \newline \quad \bullet To cancel the transmission, press ESC. \ Receiving unit & \newline The receiving unit does not have enough memory for what is being sent. Press ESC or ENTER to cancel the transmission. \ \end{tabular}
Chapter 22: Linking and Upgrading 369

Deleting Variables, Flash Applications, or Folders
Note: You cannot delete the Main folder.
Note: Use \boxedF4 to select multiple variables, Flash applications, or folders. Use \boxedF4 again to deselect any that you do not want to delete.
- Press \boxed2nd [\boxedVAR-LINK] to display the VAR-LINK screen.
- Select the variables, folders, or Flash applications to delete.
- To select a single variable or Flash application, move the cursor to highlight it.
- To select a single folder, highlight it and press \boxedF4 to place a checkmark (\checkmark) beside it. This selects the folder and its contents.
- To select multiple variables, Flash applications, or folders highlight each one and press \boxedF4 to place a checkmark (\checkmark) beside it.
- To select all variables, Flash applications, or folders use \boxedF5 All 1:Select All.
- Press \boxedF1 and choose 1:Delete. — or — Press \boxed\leftarrow. A confirmation message appears.
- Press \boxedENTER to confirm the deletion.
Where to Get Flash Applications
For up-to-date information about available Flash applications, check the Texas Instruments web site at:
education.ti.com
or contact Texas Instruments as described in Appendix C.
You can download a Flash application and/or certificate from the Texas Instruments web site to a computer, and use a TI-GRAPH LINK computer-to-calculator cable to install the application or certificate on your TI-89 / TI-92 Plus.
For installation instructions, refer to the Flash Applications instructions in the front of this guidebook, or to your TI™ Connect online help or TI-GRAPH LINK guidebook.

370 Chapter 22: Linking and Upgrading
Transmitting Variables under Program Control
You can use a program containing GetCalc and SendCalc or SendChat to transmit a variable from one calculator to another.
Overview of Commands
SendCalc sends a variable to the link port, where a linked calculator can receive the variable value. The linked calculator must be on the Home screen or must execute GetCalc from a program. If you send to a TI-92, however, an error occurs if the TI-92 executes GetCalc from a program. In this case, you must use SendChat instead.
SendChat, a general alternative to SendCalc, is useful if the receiving calculator is a TI-92 (or for a generic chat program that allows a TI-89, TI-92, or TI-92 Plus to be the receiving calculator). SendChat sends a variable only if that variable is compatible with the TI-92, which is typically true in chat programs. However, SendChat will not send an archived variable, a TI-89 or TI-92 Plus graph data base, etc.
The "Chat" Program
The following program uses GetCalc and SendChat. The program sets up two loops that let the linked calculators take turns sending and receiving/displaying a variable named msg. InputStr lets each user enter a message in the msg variable.
 :Chat()
:Prgm
:ClrIO
:Disp "On first unit to send,"," enter 1;","On first to receive,"
:InputStr " enter 0",msg
:If msg="0" Then
: While true
: GetCalc msg
: Disp msg
: InputStr msg
: SendChat msg
: EndWhile
:Else
: While true
: InputStr msg
: SendChat msg
: GetCalc msg
: Disp msg
: EndWhile
:EndIf
:EndPrgm
Sets up this unit to receive and display the variable msg. Then lets this user enter a message in msg and send it. Lets this user enter a message in msg and send it. Then sets up this unit to receive and display msg. Loop executed by the unit that receives the first message. Loop executed by the unit that sends the first message.
To synchronize GetCalc and SendChat, the loops are arranged so that the receiving unit executes GetCalc while the sending unit is waiting for the user to enter a message.
Chapter 22: Linking and Upgrading 371
Running the Program
This procedure assumes that:
- The two calculators are linked with the connecting cable as described on page 366.
- The Chat program is loaded on both calculators. (A program loaded on a TI-92 must use SendCalc instead of SendChat.)
- Use each calculator’s Program Editor to enter the program. — or —
- Enter the program on one calculator and then use VAR-LINK to transmit the program variable to the other calculator as described on page 367.
To run the program on both calculators:
- On the Home screen of each calculator, enter: chat()
- When each calculator displays its initial prompt, respond as shown below.
| On the: | Type: |
|---|---|
| Calculator that will send the first message. | 1 and press [ENTER]. |
| Calculator that will receive the first message. | 0 and press [ENTER]. |
- Take turns typing a message and pressing [ENTER] to send the variable msg to the other calculator.
Stopping the Program
Because the Chat program sets up an infinite loop on both calculators, press [ON] (on both calculators) to break the program. If you press [ESC] to acknowledge the error message, the program stops on the Program I/O screen. Press [F5] or [ESC] to return to the Home screen.
372 Chapter 22: Linking and Upgrading
Upgrading Product Software (Base Code)
You can upgrade the product software (base code) on your TI-89 / TI-92 Plus. You can also transfer product software (base code) from one TI-89 or TI-92 Plus to another, provided that the receiving unit has the correct certification that allows it to run that software.
Product Software (Base Code) Upgrades
The term product software includes these two types of base code upgrades:
• Maintenance upgrades (which are released free of charge).
• Feature upgrades (some of which are for purchase). Before downloading a purchased feature upgrade from the Texas Instruments web site, you must provide your calculator's electronic ID number. This information is used to create a customized electronic certificate that specifies which product software your unit is licensed to run.
Installing either a maintenance upgrade or a feature upgrade resets all calculator memory to the original factory settings. This means that all user-defined variables, programs, lists, and Flash applications will be deleted. See the important information concerning batteries (below) and "Backing Up Your Unit Before a Product Software (Base Code) Installation" on page 374 before performing a base code (maintenance or feature) upgrade.
I mportant Product Software (Base Code) Download Information
New batteries should be installed before beginning a base code (maintenance or feature upgrade) download.
When in base code download mode, the Automatic Power Down™ (APD™) feature does not function. If you leave your calculator in download mode for an extended time before you actually start the downloading process, your batteries may become depleted. You will then need to replace the depleted batteries with new batteries before downloading.
You can also transfer base code from calculator-to-calculator using a unit-to-unit cable. If you accidentally interrupt the transfer before it is complete, you will need to reinstall the base code via a computer. Again, remember to install new batteries before downloading.
Please contact Texas Instruments as described in Appendix C if you experience a problem.
Chapter 22: Linking and Upgrading 373
Backing Up Your Unit Before a Product Software (Base Code) Installation
When you install a product software (base code) upgrade, the installation process:
- Deletes all user-defined variables (in both RAM and the user data archive), functions, programs, and folders.
- Could delete all Flash applications.
- Resets all system variables and modes to their original factory settings. This is equivalent to using the MEMORY screen to reset all memory.
Important: Before installation, install new batteries.
To retain any existing variables or Flash applications, do the following before installing the upgrade:
- Transmit the variables or Flash applications to another calculator as described on page 367. — or —
- Use a TI-GRAPH LINK™ computer-to-calculator cable and TI™ Connect or TI-GRAPH LINK software (available at no charge from the Texas Instruments web site) to send the variables and/or Flash applications to a computer.
Note: The computer-to-calculator cable is not the same as the cable that came with your calculator.
If you have a TI-GRAPH LINK computer-to-calculator cable and software for the TI-92, be aware that the TI-92 TI-GRAPH LINK software is not compatible with either the TI-89 or the TI-92 Plus. The cable, however, works with all units. For information about obtaining a TI-GRAPH LINK computer-to-calculator cable for the TI-89 / TI-92 Plus, check the Texas Instruments web site at:
education.ti.com
or contact Texas Instruments as described in Appendix C.
Where to Get Product Software (Base Code)
For up-to-date information about available product software (base code) upgrades and installation instructions, check the Texas Instruments web site at:
education.ti.com
or contact Texas Instruments as described in Appendix C.
You can download product software and/or a certificate from the Texas Instruments web site to a computer, and use a TI-GRAPH LINK computer-to-calculator cable to install it on your TI-89 / TI-92 Plus.
For complete information, refer to the instructions on the web.

374 Chapter 22: Linking and Upgrading