Menus
To leave the keyboard uncluttered, the TI-89 / TI-92 Plus uses menus to access many operations. This section gives an overview of how to select an item from any menu. Specific menus are described in the appropriate chapters of this guidebook.
Displaying a Menu
| Press: | To display: |
|---|---|
| [F1], [F2], etc. | A toolbar menu — Drops down from the toolbar at the top of most application screens. Lets you select operations useful for that application. |
| [APPS] | APPLICATIONS menu — Lets you select from a list of applications. Refer to page 38. |
| [2nd] [CHAR] | CHAR menu — Lets you select from categories of special characters (Greek, math, etc.). |
| [2nd] [MATH] | MATH menu — Lets you select from categories of math operations. |
| TI-89: [CATALOG] | CATALOG menu — Lets you select from a complete, alphabetic list of the TI-89 / TI-92 Plus’s built-in functions and instructions. Also lets you select user-defined functions or Flash application functions (if any have been defined or loaded). |
| TI-92 Plus: [2nd] [CATALOG] | |
| [2nd] [CUSTOM] | CUSTOM menu — Lets you access a menu that you can customize to list any available function, instruction, or character. The TI-89 / TI-92 Plus includes a default custom menu, which you can modify or redefine. Refer to page 37 and to Chapter 17. |
Selecting an Item from a Menu
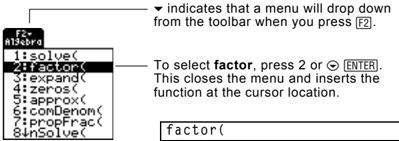
To select an item from the displayed menu, either:
- Press the number or letter shown to the left of that item. For a letter on the TI-89, press [alpha] and then a letter key. — or —
- Use the cursor pad ◀ and ▶ to highlight the item, and then press [ENTER]. (Note that pressing ▶ from the first item moves the highlight to the last item, and vice versa.)
34 Chapter 2: Operating the Calculator
Items Ending with ▶ (Submenus)
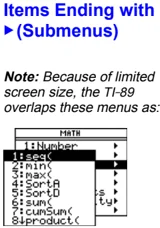
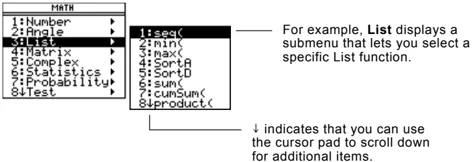
If you select a menu item ending with ▶, a submenu is displayed. You then select an item from the submenu.
Note: Because of limited screen size, the TI-89 overlaps these menus as:
For example, List displays a submenu that lets you select a specific List function.
↓ indicates that you can use the cursor pad to scroll down for additional items.
For items that have a submenu, you can use the cursor pad as described below.
- To display the submenu for the highlighted item, press \textcircledD. (This is the same as selecting that item.)
- To cancel the submenu without making a selection, press \textcircledC. (This is the same as pressing ESC.)
- To wrap to the last menu item directly from the first menu item, press \textcircledS. To wrap to the first menu item directly from the last menu item, press \textcircledS.
Items Containing “…” (Dialog Boxes)
If you select a menu item containing “…” (ellipsis marks), a dialog box is displayed for you to enter additional information.
For example, Save Copy As ... displays a dialog box that prompts you to select a folder name and type a variable name.
\rightarrow indicates that you can press \textcircledD to display and select from a menu.
An input box indicates that you must type a value. (Alpha-lock is automatically turned on for the TI-89. See page 22.)
After typing in an input box such as Variable, you must press ENTER twice to save the information and close the dialog box.
Canceling a Menu
To cancel the current menu without making a selection, press ESC. Depending on whether any submenus are displayed, you may need to press ESC several times to cancel all displayed menus.
Chapter 2: Operating the Calculator 35
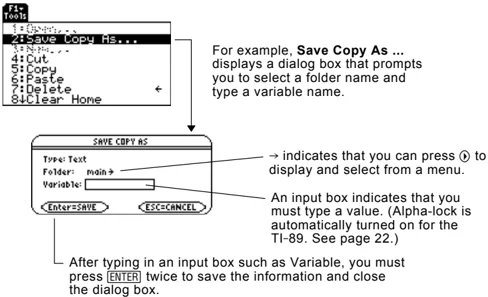
To move from one toolbar menu to another without making a selection, either:
• Press the key (F1, F2, etc.) for the other toolbar menu. — or —
• Use the cursor pad to move to the next (press \blacktriangleright) or previous (press \blacktriangleleft) toolbar menu. Pressing \blacktriangleright from the last menu moves to the first menu, and vice versa.
When using \blacktriangleright, be sure that an item with a submenu is not highlighted. If so, \blacktriangleright displays that item’s submenu instead of moving to the next toolbar menu.
Example: Selecting a Menu Item
Round the value of \pi to three decimal places. Starting from a clear entry line on the Home screen:
-
Press 2nd [MATH] to display the MATH menu.
-
Press 1 to display the Number submenu. (Or press ENTER since the first item is automatically highlighted.)
-
Press 3 to select round. (Or press \blacktriangleright \blacktriangleright and ENTER.)
-
Press 2nd [\pi] , 3 ] and then ENTER to evaluate the expression.
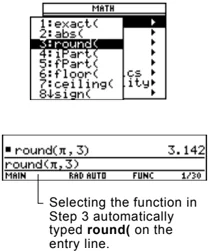
Selecting the function in Step 3 automatically typed round( on the entry line.
36 Chapter 2: Operating the Calculator
Using the Custom Menu
The TI-89 / TI-92 Plus has a custom menu that you can turn on and off at any time. You can use the default custom menu or create your own as described in Chapter 17: Programming.
Turning the Custom Menu On and Off
When you turn on the custom menu, it replaces the normal toolbar menu. When you turn it off, the normal menu returns. For example, from the Home screen’s normal toolbar menu, press [2nd] [CUSTOM] to toggle the custom menu on and off.
Note: You can also turn the custom menu on and off by entering CustmOn or CustmOff in the entry line and pressing [ENTER].
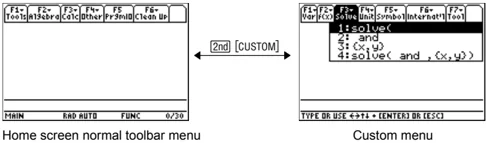
Home screen normal toolbar menu
Custom menu
Unless the menu has been modified, the default custom menu appears.
| Menu | Function |
|---|---|
[F1] Var |
Common variable names. |
[F2] f(x) |
Function names such as f(x), g(x), and f(x,y). |
[F3] Solve |
Items related to solving equations. |
[F4] Unit |
Common units such as _m, _ft, and _l. |
[F5] Symbol |
Symbols such as #, ?, and ~. |
| Internat’l | Commonly accented characters such as è, é, and ê. |
TI-89: [2nd] [F6] |
|
TI-92 Plus: [F6] |
|
| Tool | ClrHome, NewProb, and CustmOff. |
TI-89: [2nd] [F7] |
|
TI-92 Plus: [F7] |
Tip: A custom menu can give you quick access to commonly used items. Chapter 17 shows you how to create custom menus for the items you use most often.
Restoring the Default Custom Menu
If a custom menu other than the default is displayed and you want to restore the default:
- From the Home screen, use
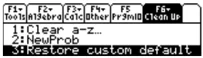
[2nd] [CUSTOM]to turn off the custom menu and display the Home screen’s normal toolbar menu. - Display the Clean Up toolbar menu, and select 3:Restore custom default.
TI-89:
[2nd] [F6]TI-92 Plus:[F6]This pastes the commands used to create the default menu into the entry line. - Press
[ENTER]to execute the commands and restore the default.
Note: The previous custom menu is erased. If that menu was created with a program (Chapter 17), it can be recreated later by running the program again.
Chapter 2: Operating the Calculator 37
Selecting an Application
The TI-89 / TI-92 Plus has different applications that let you solve and explore a variety of problems. You can select an application from a menu, or you can access commonly used applications directly from the keyboard.
From the APPLICATIONS Menu
Note: To cancel the menu without making a selection, press [ESC].
- Press [APPS] to display a menu that lists the applications.
- Select an application. Either:
- Use the cursor pad ◀ or ▶ to highlight the application and then press [ENTER]. — or —
- Press the number or letter for that application.
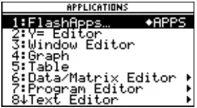
| Application: | Lets you: |
|---|---|
| FlashApps | Display a list of Flash applications, if any. |
| Y= Editor | Define, edit, and select functions or equations for graphing (Chapters 6–11). |
| Window Editor | Set window dimensions for viewing a graph (Chapter 6). |
| Graph | Display graphs (Chapter 6). |
| Table | Display a table of variable values that correspond to an entered function (Chapter 13). |
| Data/Matrix Editor | Enter and edit lists, data, and matrices. You can perform statistical calculations and graph statistical plots (Chapters 15 and 16). |
| Program Editor | Enter and edit programs and functions (Chapter 17). |
| Text Editor | Enter and edit a text session (Chapter 18). |
| Numeric Solver | Enter an expression or equation, define values for all but one variable, and then solve for the unknown variable (Chapter 19). |
| Home | Enter expressions and instructions, and perform calculations. |
38 Chapter 2: Operating the Calculator
From the Keyboard
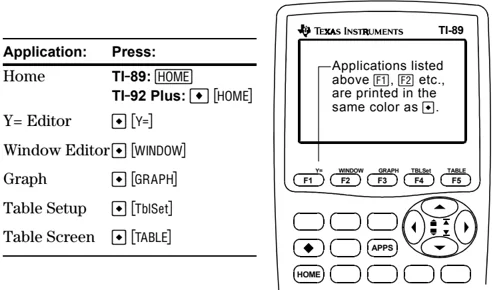
You can access commonly used applications from the keyboard. On the TI-89 for example, ◆ [Y=] is the same as pressing ◆ and then [F1]. This guidebook uses the notation ◆ [Y=], similar to the notation used in second functions.
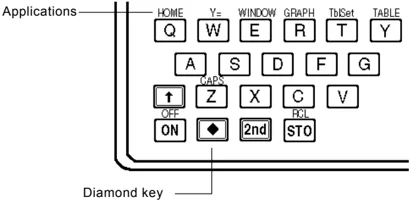
On the TI-92 Plus, applications are listed above the QWERTY keys.
Chapter 2: Operating the Calculator 39
Setting Modes
Modes control how numbers and graphs are displayed and interpreted. Mode settings are retained by the Constant Memory™ feature when the TI-89 / TI-92 Plus is turned off. All numbers, including elements of matrices and lists, are displayed according to the current mode settings.
Checking Mode Settings
Press [MODE] to display the MODE dialog box, which lists the modes and their current settings.
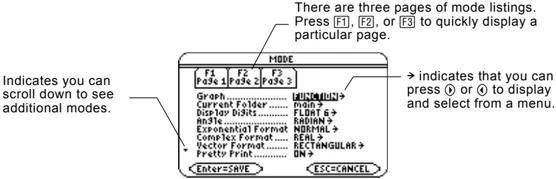
Indicates you can scroll down to see additional modes.
There are three pages of mode listings. Press [F1], [F2], or [F3] to quickly display a particular page.
\rightarrow indicates that you can press \blacktriangleright or \blacktriangleleft to display and select from a menu.
Note: Modes that are not currently valid are dimmed. For example, on Page 2, Split 2 App is not valid when Split Screen = FULL. When you scroll through the list, the cursor skips dimmed settings.
Changing Mode Settings
From the MODE dialog box:
- Highlight the mode setting you want to change. Use \blacktriangleright or \blacktriangleleft (with [F1], [F2], or [F3]) to scroll through the list.
- Press \blacktriangleright or \blacktriangleleft to display a menu that lists the valid settings. The current setting is highlighted.
- Select the applicable setting. Either:
- Use \blacktriangleright or \blacktriangleleft to highlight the setting and press [ENTER]. — or —
- Press the number or letter for that setting.
- Change other mode settings, if necessary.
- When you finish all your changes, press [ENTER] to save the changes and exit the dialog box.
Tip: To cancel a menu and return to the MODE dialog box without making a selection, press [ESC].
Important: If you press [ESC] instead of [ENTER] to exit the MODE dialog box, any mode changes you made will be canceled.
40 Chapter 2: Operating the Calculator
Overview of the Modes
| Mode | Description |
|---|---|
| Graph | Type of graphs to plot: FUNCTION, PARAMETRIC, POLAR, SEQUENCE, 3D, or DE. |
| Current Folder | Folder used to store and recall variables. Unless you have created additional folders, only the MAIN folder is available. Refer to “Using Folders to Store Independent Sets of Variables” in Chapter 5. |
| Display Digits | Maximum number of digits (FLOAT) or fixed number of decimal places (FIX) displayed in a floating-point result. Regardless of the setting, the total number of displayed digits in a floating-point result cannot exceed 12. Refer to page 31. |
| Angle | Units in which angle values are interpreted and displayed: RADIAN or DEGREE. |
| Exponential Format | Notation used to display results: NORMAL, SCIENTIFIC, or ENGINEERING. Refer to page 31. |
| Complex Format | Format used to display complex results, if any: REAL (complex results are not displayed unless you use a complex entry), RECTANGULAR, or POLAR. |
| Vector Format | Format used to display 2- and 3-element vectors: RECTANGULAR, CYLINDRICAL, or SPHERICAL. |
| Pretty Print | Turns the pretty print display feature OFF or ON. Refer to page 29. |
| Split Screen | Splits the screen into two parts and specifies how the parts are arranged: FULL (no split screen), TOP-BOTTOM, or LEFT-RIGHT. Refer to Chapter 14. |
| Split 1 App | Application in the top or left side of a split screen. If you are not using a split screen, this is the current application. |
| Split 2 App | Application in the bottom or right side of a split screen. This is active only for a split screen. |
| Number of Graphs | For a split screen, lets you set up both sides of the screen to display independent sets of graphs. |
| Graph 2 | If Number of Graphs = 2, selects the type of graph in the Split 2 part of the screen. Refer to Chapter 12. |
| Split Screen Ratio | Proportional sizes of the two parts of a split screen: 1:1, 1:2, or 2:1. (TI-92 Plus only) |
| Exact/Approx | Calculates expressions and displays results in numeric form or in rational/symbolic form: AUTO, EXACT, or APPROXIMATE. Refer to page 29. |
Note: For detailed information about a particular mode, look in the applicable section of this guidebook.
Chapter 2: Operating the Calculator 41
Modes (continued)
| Mode | Description |
|---|---|
| Base | Lets you perform calculations by entering numbers in decimal (DEC), hexadecimal (HEX), or binary (BIN) form. |
| Unit System | Lets you enter a unit for values in an expression, such as 6_m * 4_m or 23_m/_s * 10_s, convert values from one unit to another within the same category, and create your own user-defined units. |
| Custom Units | Lets you select custom defaults. The mode is dimmed until you select Unit System, 3:CUSTOM. |
| Language | Lets you localize the TI-89 / TI-92 Plus into one of several languages, depending on which language Flash applications are installed. |
42 Chapter 2: Operating the Calculator
Using the Clean Up Menu to Start a New Problem
On the Home screen, the Clean Up toolbar menu lets you start a new calculation from a cleared state without resetting the TI-89 / TI-92 Plus’s memory.
Clean Up Toolbar Menu
From the Home screen, display the Clean Up menu by pressing:
TI-89: [2nd] [F6]
TI-92 Plus: [F6]
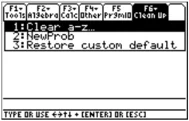
| Menu Item | Description |
|---|---|
| Clear a–z | Clears (deletes) all single-character variable names in the current folder, unless the variables are locked or archived. You will be prompted to press [ENTER] to confirm the action.Single-character variable names are often used in symbolic calculations such as:solve(a·x²+b·x+c=0,x)If any of the variables have already been assigned a value, your calculation may produce misleading results. To prevent this, you can select 1:Clear a–z before beginning the calculation. |
| NewProb | Places NewProb in the entry line. You must then press [ENTER] to execute the command.NewProb performs a variety of operations that let you begin a new problem from a cleared state without resetting the memory:• Clears all single-character variable names in the current folder (same as 1:Clear a–z), unless the variables are locked or archived.• Turns off all functions and stat plots (FnOff and PlotsOff) in the current graphing mode.• Performs ClrDraw, ClrErr, ClrGraph, ClrHome, ClrIO, and ClrTable. |
| Restore custom default | If a custom menu other than the default is in effect, this lets you restore the default. Refer to page 37. |
Tip: When defining a variable that you want to retain, use more than one character in the name. This prevents it from being deleted inadvertently by 1:Clear a–z.
Note: For information about checking and resetting memory or other system defaults, refer to Chapter 21.
Chapter 2: Operating the Calculator 43
Using the Catalog Dialog Box
The CATALOG provides a way to access any built-in TI-89 / TI-92 Plus command (functions and instructions) from one convenient list. In addition, the CATALOG dialog box lets you select functions used in Flash applications or user-defined functions (if any have been loaded or defined).
Displaying the CATALOG
To display the CATALOG dialog box, press:
TI-89: [CATALOG]
TI-92 Plus: [2nd] [CATALOG]
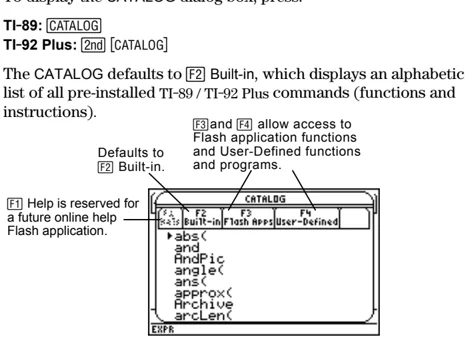
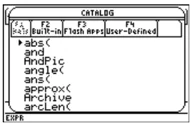
The CATALOG defaults to F2 Built-in, which displays an alphabetic list of all pre-installed TI-89 / TI-92 Plus commands (functions and instructions).
Note: Options that are not currently valid are dimmed. For example, F1 Help is reserved for a future online help Flash application. F3 Flash Apps is dimmed if you have not installed a Flash application. F4 User-Defined is dimmed if you have not created a function or a program.
Selecting a Built-in Command from the CATALOG
When you select a command, its name is inserted in the entry line at the cursor location. Therefore, you should position the cursor as necessary before selecting the command.
-
Press: TI-89: [CATALOG] TI-92 Plus: [2nd] [CATALOG]
-
Press F2 Built-in.
Note: The first time you display the Built-in list, it starts at the top of the list. The next time you display the list, it starts at the same place you left it.
- Commands are listed in alphabetical order. Commands that do not start with a letter (+, %, \sqrt, \Sigma, etc.) are at the end of the list.
- To exit the CATALOG without selecting a command, press [ESC].
44 Chapter 2: Operating the Calculator
- Move the ► indicator to the command, and press [ENTER].
To move the ► indicator: One command at a time One page at a time To the first command that begins with a specified letter
Press or type: ⊙ or ⊕ [2nd] ⊙ or [2nd] ⊕ The letter key. (On the TI-89, do not press [alpha] first. If you do, you need to press [alpha] or [2nd] [a-lock] again before you can type a letter.)
Tip: From the top of the list, press ⊖ to move to the bottom. From the bottom, press ⊕ to move to the top.
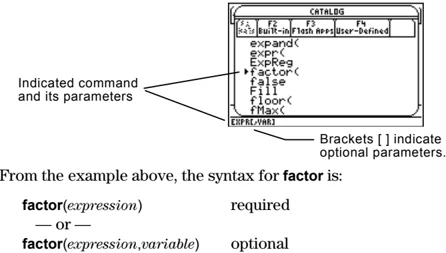
I nformation about Parameters
For the command indicated by ►, the status line shows the required and optional parameters, if any, and their type.
Note: For details about the parameters, refer to that command's description in Appendix A.
From the example above, the syntax for factor is:
factor(expression) required — or — factor(expression,variable) optional
S electing a Flash Application Function
A Flash application may contain one or more functions. When you select a function, its name is inserted in the entry line at the cursor location. Therefore, you should position the cursor as necessary before selecting the function.
-
Press: TI-89: [CATALOG] TI-92 Plus: [2nd] [CATALOG]
-
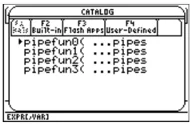
Press [F3] Flash Apps. (This option is dimmed if no Flash applications are installed in the TI-89 / TI-92 Plus.)
• The list is alphabetized by function name. The left column lists functions. The right column lists the Flash application that contains the function. • Information about a function is displayed in the status line. • To exit without selecting a function, press [ESC].
Chapter 2: Operating the Calculator 45
- Move the ▶ indicator to the function, and press [ENTER].
| To move the ▶ indicator: | Press or type: |
|---|---|
| One function at a time | ◀ or ▶ |
| One page at a time | [2nd] ◀ or [2nd] ▶ |
| To the first function that begins with a specified letter | The letter key. (On the TI-89, do not press [alpha] first. If you do, you need to press [alpha] or [2nd] [a-lock] again before you can type a letter.) |
Selecting a User-Defined Function or Program
You can create your own functions or programs and then use [F4] User-Defined to access them. For instructions on how to create functions, see “Creating and Evaluating User-Defined Functions” in Chapter 5, and “Overview of Entering a Function” in Chapter 17. See Chapter 17 for instructions on how to create and run a program.
When you select a function or program, its name is inserted in the entry line at the cursor location. Therefore, you should position the cursor as necessary before selecting the function or program.
-
Press:
- TI-89: [CATALOG]
- TI-92 Plus: [2nd] [CATALOG]
-
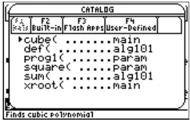
Press [F4] User-Defined. (This option is dimmed if you have not defined a function or created a program.)

- The list is alphabetized by function / program name. The left column lists functions and programs. The right column lists the folder that contains the function or program.
- If the function or program’s first line is a comment, the comment text is displayed in the status line.
- To exit without selecting a function or program, press [ESC].
- Move the ▶ indicator to the function or program, and press [ENTER].
| To move the ▶ indicator: | Press or type: |
|---|---|
| One function or program at a time | ◀ or ▶ |
| One page at a time | [2nd] ◀ or [2nd] ▶ |
| To the first function or program that begins with a specified letter | The letter key. (On the TI-89, do not press [alpha] first. If you do, you need to press [alpha] or [2nd] [a-lock] again before you can type a letter.) |
Note: Use the VAR-LINK screen to manage variables, folders, and Flash applications. See Chapter 21.
46 Chapter 2: Operating the Calculator
Storing and Recalling Variable Values
When you store a value, you store it as a named variable. You can then use the name instead of the value in expressions. When the TI-89 / TI-92 Plus encounters the name in an expression, it substitutes the variable’s stored value.
Rules for Variable Names
A variable name:
- Can use 1 to 8 characters consisting of letters and digits. This includes Greek letters (but not π), accented letters, and international letters. Do not include spaces.
- The first character cannot be a digit.
- Can use uppercase or lowercase letters. The names AB22, Ab22, aB22, and ab22 all refer to the same variable.
- Cannot be the same as a name that is preassigned by the TI-89 / TI-92 Plus. Preassigned names include:
- Built-in functions (such as abs) and instructions (such as LineVert). Refer to Appendix A.
- System variables (such as xmin and xmax, which are used to store graph-related values). Refer to Appendix B for a list.
Examples
| Variable | Description |
|---|---|
| myvar | OK |
| a | OK |
| Log | Not OK, name is preassigned to the log function. |
| Log1 | OK |
| 3rdTotal | Not OK, starts with a digit. |
| circumfer | Not OK, more than 8 characters. |
Data Types
You can save any TI-89 / TI-92 Plus data type as a variable. For a list of data types, refer to getType() in Appendix A. Some examples are:
| Data Types | Examples |
|---|---|
| Expressions | 2.54, 1.25E6, 2π, xmin/10, 2+3i, (x−2)², √□/□ |
| Lists | {2 4 6 8}, {1 1 2} |
| Matrices | [1 0 0], [1 0 0] |
| [3 4 6] | |
| Character strings | “Hello”, “The answer is:”, “xmin/10” |
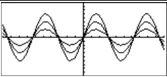
| Pictures | |
| Functions | myfunc(arg), ellipse(x,y,r1,r2) |
Chapter 2: Operating the Calculator 47
Storing a Value in a Variable
Note: TI-89 users should use \boxedalpha as necessary when typing variable names.
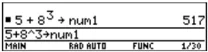
- Enter the value you want to store, which can be an expression.
- Press \boxedSTO\triangleright. The store symbol (\triangleright) is displayed.
- Type the variable name.
- Press \boxedENTER.
To store to a variable temporarily, you can use the “with” operator. Refer to “Substituting Values and Setting Constraints” in Chapter 3.
Displaying a Variable
Note: Refer to Chapter 3 for information about symbolic manipulation.
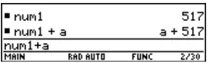
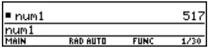
- Type the variable name.
- Press \boxedENTER.
If the variable is undefined, the variable name is shown in the result.
In this example, the variable a is undefined. Therefore, it is used as a symbolic variable.
Using a Variable in an Expression
Tip: To view a list of existing variable names, use \boxed2nd \boxedVAR-LINK as described in Chapter 21.
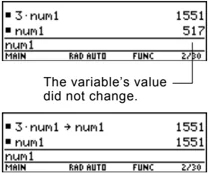
- Type the variable name into the expression.
- Press \boxedENTER to evaluate the expression.
The variable’s value did not change.
If you want the result to replace the variable’s previous value, you must store the result.
Recalling a Variable’s Value
In some cases, you may want to use a variable’s actual value in an expression instead of the variable name.
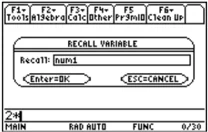
- Press \boxed2nd \boxedRCL to display a dialog box.
- Type the variable name.
- Press \boxedENTER twice.
In this example, the value stored in num1 will be inserted at the cursor position in the entry line.
48 Chapter 2: Operating the Calculator
Reusing a Previous Entry or the Last Answer
You can reuse a previous entry by reexecuting the entry “as is” or by editing the entry and then reexecuting it. You can also reuse the last calculated answer by inserting it into a new expression.
Reusing the Expression on the Entry Line
When you press ENTER to evaluate an expression, the TI-89 / TI-92 Plus leaves that expression on the entry line and highlights it. You can type over the entry, or you can reuse it as necessary.
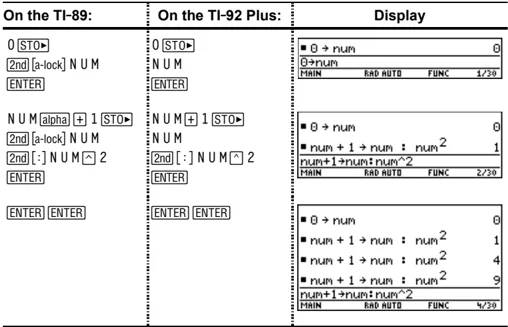
For example, using a variable, find the square of 1, 2, 3, etc.
As shown below, set the initial variable value and then enter the variable expression. Next, reenter to increment the variable and calculate the square.
Tip: Reexecuting an entry "as is" is useful for iterative calculations that involve variables.
\begin{tabular}{|l|l|l|} \hline On the TI-89: & On the TI-92 Plus: & Display \ \hline 0 [STO] & 0 [STO] & \blacksquare 0 \rightarrow num \ [2nd] [a-lock] NUM & NUM & 0 \rightarrow num \ ENTER & ENTER & MAIN F6 AUTO FUNC 1/30 \ \hline NUM [alpha] [+] 1 [STO] & NUM [+] 1 [STO] & \blacksquare 0 \rightarrow num \ [2nd] [a-lock] NUM & NUM & \blacksquare num + 1 \rightarrow num : num^2 \ [2nd] [:] NUM [^] 2 & [2nd] [:] NUM [^] 2 & num+1\rightarrownum:num^2 \ ENTER & ENTER & MAIN F6 AUTO FUNC 2/30 \ \hline ENTER ENTER & ENTER ENTER & \blacksquare 0 \rightarrow num \ & & \blacksquare num + 1 \rightarrow num : num^2 \ & & \blacksquare num + 1 \rightarrow num : num^2 \ & & \blacksquare num + 1 \rightarrow num : num^2 \ & & num+1\rightarrownum:num^2 \ & & MAIN F6 AUTO FUNC 4/30 \ \hline \end{tabular}
Chapter 2: Operating the Calculator 49
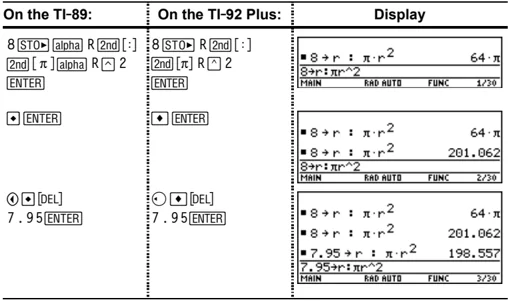
Tip: Editing an entry lets you make minor changes without retyping the entire entry.
Using the equation A=πr², use trial and error to find the radius of a circle that covers 200 square centimeters.
The example below uses 8 as the first guess and then displays the answer in its approximate floating-point form. You can edit and reexecute using 7.95 and continue until the answer is as accurate as you want.
| On the TI-89: | On the TI-92 Plus: | Display |
|---|---|---|
| 8 [STO▶] [alpha] R [2nd] [:] [2nd] [π] [alpha] R [^] 2 [ENTER] | 8 [STO▶] R [2nd] [:] [2nd] [π] R [^] 2 [ENTER] | ■ 8 → r : π·r² 64·π8→r:πr^2MAIN RAD AUTO FUNC □/□□ |
| ◆ [ENTER] | ◆ [ENTER] | ■ 8 → r : π·r² 64·π■ 8 → r : π·r² 201.0628→r:πr^2MAIN RAD AUTO FUNC □/□□ |
| ◀ ◆ [DEL] 7.95 [ENTER] | ◀ ◆ [DEL] 7.95 [ENTER] | ■ 8 → r : π·r² 64·π■ 8 → r : π·r² 201.062■ 7.95 → r : π·r² 198.5577.95→r:πr^2MAIN RAD AUTO FUNC □/□□ |
Note: When the entry contains a decimal point, the result is automatically displayed in floating-point.
Recalling a Previous Entry
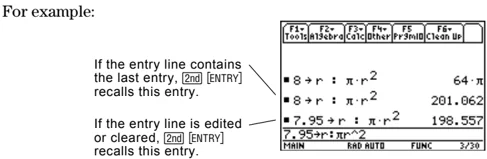
You can recall any previous entry that is stored in the history area, even if the entry has scrolled off the top of the screen. The recalled entry replaces whatever is currently shown on the entry line. You can then reexecute or edit the recalled entry.
Note: You can also use the entry function to recall any previous entry. Refer to entry() in Appendix A.
| To recall: | Press: | Effect: |
|---|---|---|
| The last entry (if you’ve changed the entry line) | [2nd] [ENTRY] once | If the last entry is still shown on the entry line, this recalls the entry prior to that. |
| Previous entries | [2nd] [ENTRY] repeatedly | Each press recalls the entry prior to the one shown on the entry line. |
For example:
If the entry line contains the last entry, [2nd] [ENTRY] recalls this entry.
If the entry line is edited or cleared, [2nd] [ENTRY] recalls this entry.
50 Chapter 2: Operating the Calculator
Recalling the Last Answer
Each time you evaluate an expression, the TI-89 / TI-92 Plus stores the answer to the variable ans(1). To insert this variable in the entry line, press 2nd [ANS].
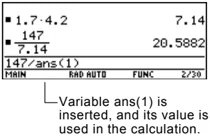
For example, calculate the area of a garden plot that is 1.7 meters by 4.2 meters. Then calculate the yield per square meter if the plot produces a total of 147 tomatoes.
-
Find the area. 1.7 × 4.2 ENTER
-
Find the yield. 147 \div 2nd [ANS] ENTER
Variable ans(1) is inserted, and its value is used in the calculation.
Note: Refer to ans() in Appendix A.
Just as ans(1) always contains the last answer, ans(2), ans(3), etc., also contain previous answers. For example, ans(2) contains the next-to-last answer.
Chapter 2: Operating the Calculator 51
Auto-Pasting an Entry or Answer from the History Area
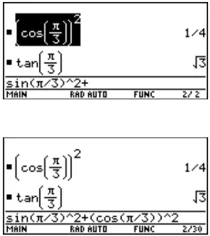
You can select any entry or answer from the history area and “auto-paste” a duplicate of it on the entry line. This lets you insert a previous entry or answer into a new expression without having to retype the previous information.
Why Use Auto-Paste
The effect of using auto-paste is similar to [2nd] [ENTRY] and [2nd] [ANS] as described in the previous section, but there are differences.
Note: You can also paste information by using the F1 toolbar menu. Refer to "Cutting, Copying, and Pasting Information" in Chapter 5.
\begin{tabular}{lll} For entries: & Pasting lets you: & [2nd] [ENTRY] lets you: \ & Insert any previous & Replace the contents of the \ & entry into the entry & entry line with any previous \ & line. & entry. \ For answers: & Pasting lets you: & [2nd] [ANS] lets you: \ & Insert the displayed & Insert the variable ans(1), \ & value of any & which contains the last \ & previous answer & answer only. Each time you \ & into the entry line. & enter a calculation, ans(1) is \ & & updated to the latest answer. \ \end{tabular}
Auto-Pasting an Entry or Answer
- On the entry line, place the cursor where you want to insert the entry or answer.
- Press \ominus to move the cursor up into the history area. This highlights the last answer.
- Use \ominus and \oplus to highlight the entry or answer to auto-paste.
- \ominus moves from answer to entry up through the history area.
- You can use \ominus to highlight items that have scrolled off the screen.
Tip: To cancel auto-paste and return to the entry line, press ESC.
Tip: To view an entry or answer too long for one line (indicated by \blacktriangleright at the end of the line), use \circledR and \circledL or [2nd] \circledR and [2nd] \circledL.
- Press [ENTER]. The highlighted item is inserted in the entry line.
This pastes the entire entry or answer. If you need only a part of the entry or answer, edit the entry line to delete the unwanted parts.
52 Chapter 2: Operating the Calculator
Status Line Indicators in the Display
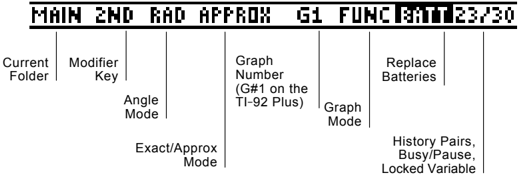
The status line is displayed at the bottom of all application screens. It shows information about the current state of the TI-89 / TI-92 Plus, including several important mode settings.
Status Line Indicators
| Indicator | Meaning |
|---|---|
| Current Folder | Shows the name of the current folder. Refer to “Using Folders to Store Independent Sets of Variables” in Chapter 5. MAIN is the default folder that is set up automatically when you use the TI-89 / TI-92 Plus. |
| Modifier Key | Shows which modifier key is in effect, as described below. |
| 2nd | [2nd] — will use the second function of the next key you press. |
| ◆ | ◆ — will use the diamond feature of the next key you press. |
| α (TI-89) | [alpha] — will type the lowercase letter for the next key you press. |
| [2nd] (TI-89) | [2nd] [a-lock] — lowercase alpha-lock is on. Until you turn this off, will type the lowercase letter for each key you press. To cancel alpha-lock, press [alpha]. |
| [↑] (TI-89) | [↑] [alpha] — uppercase ALPHA-lock is on. Until you turn this off, will type the uppercase letter for each key you press. To cancel ALPHA-lock, press [alpha]. |
| ↑ | [↑] — will type the uppercase letter for the next key you press. On the TI-89, you can use [↑] to type a letter without having to use [alpha]. |
| Angle Mode | Shows the units in which angle values are interpreted and displayed. To change the Angle mode, use the [MODE] key. |
| RAD | Radians |
| DEG | Degrees |
Note: To cancel [2nd], ◆, [alpha], or [↑], press the same key again or press a different modifier key.
Note: If the next key you press does not have a diamond feature or an associated letter, the key performs its normal operation.
Chapter 2: Operating the Calculator 53
Status Line (continued)
| Indicator | Meaning |
|---|---|
| Exact/Approx Mode | Shows how answers are calculated and displayed. Refer to page 29. To change the Exact/Approx mode, use the MODE key. |
| AUTO | Auto |
| EXACT | Exact |
| APPROX | Approximate |
| Graph Number | If the screen is split to show two independent graphs, this indicates which graph is active — GR1 or GR2. (Displays G#1 or G#2 on the TI-92 Plus.) |
| Graph Mode | Indicates the type of graphs that can be plotted. To change the Graph mode, use the MODE key. |
| FUNC | y(x) functions |
| PAR | x(t) and y(t) parametric equations |
| POL | r(θ) polar equations |
| SEQ | u(n) sequences |
| 3D | z(x,y) 3D equations |
| DE | y'(t) differential equations |
| Battery | Displayed only when the batteries are getting low. If BATT is shown with a black background, change the batteries as soon as possible. |
| History Pairs, Busy/Pause, Archived | The information shown in this part of the status line depends on the application you are using. |
| 23/30 | Displayed on the Home screen to show the number of entry/answer pairs in the history area. Refer to page 24. |
| BUSY | A calculation or graph is in progress. |
| PAUSE | You paused a graph or program. |
| ■ | The variable opened in the current editor (Data/Matrix Editor, Program Editor, or Text Editor) is locked or archived and cannot be modified. |
54 Chapter 2: Operating the Calculator
Finding the Software Version and ID Number
In some situations, you may need to find out information about your TI-89 / TI-92 Plus, particularly the software version and the unit's ID number.
Displaying the "About" Screen
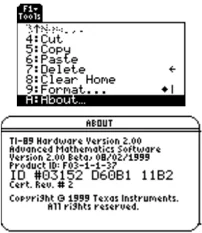
From the Home screen, press F1 and then select A:About.
Your screen will be different than the one shown to the right.
Press ENTER or ESC to close the screen.
When Do You Need this Information?
The information on the About screen is intended for situations such as:
- If you obtain new or upgraded software for your TI-89 / TI-92 Plus, you may need to provide your current software version and/or the ID number of your unit.
- If you have difficulties with your TI-89 / TI-92 Plus and need to contact technical support, knowing the software version may make it easier to diagnose the problem.
Chapter 2: Operating the Calculator 55
56 Chapter 2: Operating the Calculator
Symbolic Manipulation
3
- Preview of Symbolic Manipulation ........ 58
- Using Undefined or Defined Variables ........ 59
- Using Exact, Approximate, and Auto Modes ........ 61
- Automatic Simplification ........ 64
- Delayed Simplification for Certain Built-In Functions ........ 66
- Substituting Values and Setting Constraints ........ 67
- Overview of the Algebra Menu ........ 70
- Common Algebraic Operations ........ 72
- Overview of the Calc Menu ........ 75
- Common Calculus Operations ........ 76
- User-Defined Functions and Symbolic Manipulation ........ 77
- If You Get an Out-of-Memory Error ........ 79
- Special Constants Used in Symbolic Manipulation ........ 80
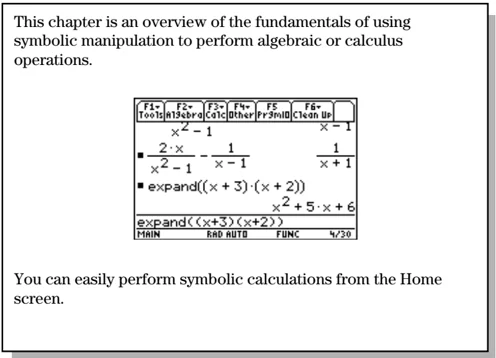
This chapter is an overview of the fundamentals of using symbolic manipulation to perform algebraic or calculus operations.

You can easily perform symbolic calculations from the Home screen.
Chapter 3: Symbolic Manipulation 57
Preview of Symbolic Manipulation
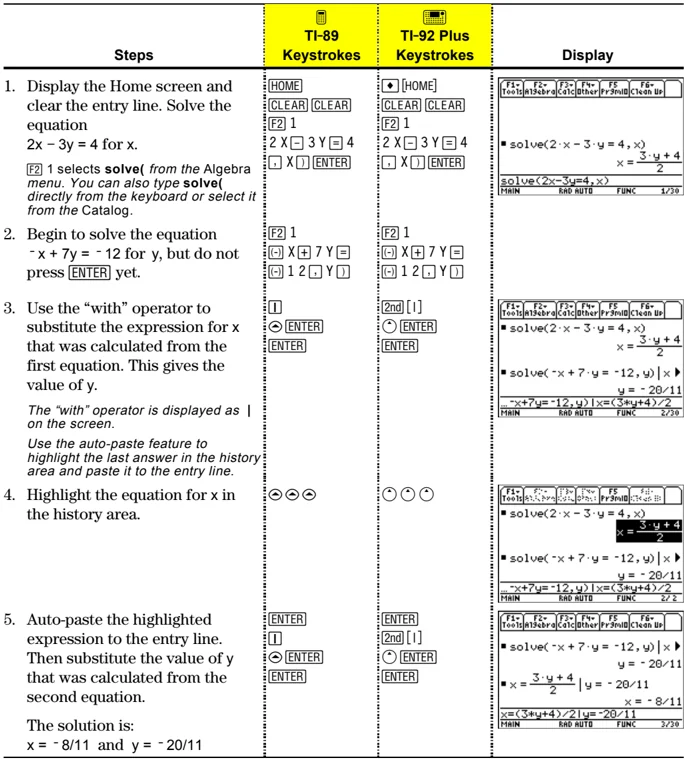
Solve the system of equations 2x - 3y = 4 and -x + 7y = -12. Solve the first equation so that x is expressed in terms of y. Substitute the expression for x into the second equation, and solve for the value of y. Then substitute the y value back into the first equation to solve for the value of x.
| Steps | TI-89 Keystrokes | TI-92 Plus Keystrokes | Display | ||||
|---|---|---|---|---|---|---|---|
| 1. Display the Home screen and clear the entry line. Solve the equation 2x - 3y = 4 for x.F2 1 selects solve( from the Algebra menu. You can also type solve( directly from the keyboard or select it from the Catalog. | HOMECLEAR CLEARF2 12 X □ 3 Y □ 4☐ X □ ENTER | ◆ [HOME]CLEAR CLEARF2 12 X □ 3 Y □ 4☐ X □ ENTER | [F1-][F2-][F3-][F4-][F5-][F6-]Tools A13cbrd Calc Other Fr3ml0 Clean Up■ solve(2·x - 3·y = 4, x)x = 3·y + 4─────2solve(2x-3y=4,x)MAIN RAD AUTO FUNC □/□□ | ||||
| 2. Begin to solve the equation -x + 7y = -12 for y, but do not press ENTER yet. | F2 1(-) X □ 7 Y □(-) 1 2 □ Y □ | F2 1(-) X □ 7 Y □(-) 1 2 □ Y □ | |||||
| 3. Use the “with” operator to substitute the expression for x that was calculated from the first equation. This gives the value of y.The “with” operator is displayed as | on the screen.Use the auto-paste feature to highlight the last answer in the history area and paste it to the entry line. | I◎ ENTERENTER | 2nd [ | ]◎ ENTERENTER | [F1-][F2-][F3-][F4-][F5-][F6-]Tools A13cbrd Calc Other Fr3ml0 Clean Up■ solve(2·x - 3·y = 4, x)x = 3·y + 4─────2■ solve(-x + 7·y = -12, y) | x ▶y = -20/11...-x+7y=-12,y) | x=(3*y+4)/2MAIN RAD AUTO FUNC □/□□ |
| 4. Highlight the equation for x in the history area. | ◀ ▲ ▶ | ◀ ▲ ▶ | [F1-][F2-][F3-][F4-][F5-][F6-]Tools A13cbrd Calc Other Fr3ml0 Clean Up■ solve(2·x - 3·y = 4, x)x = 3·y + 4─────2■ solve(-x + 7·y = -12, y) | x ▶y = -20/11...-x+7y=-12,y) | x=(3*y+4)/2MAIN RAD AUTO FUNC □/□ | ||
| 5. Auto-paste the highlighted expression to the entry line. Then substitute the value of y that was calculated from the second equation.The solution is:x = -8/11 and y = -20/11 | ENTERI◎ ENTERENTER | ENTER2nd [ | ]◎ ENTERENTER | [F1-][F2-][F3-][F4-][F5-][F6-]Tools A13cbrd Calc Other Fr3ml0 Clean Up■ solve(-x + 7·y = -12, y) | x ▶y = -20/11■ x = 3·y + 4 | y = -20/11─────2x = -8/11x=(3*y+4)/2 | y=-20/11MAIN RAD AUTO FUNC □/□□ |
This example is a demonstration of symbolic manipulation. A one-step function is available for solving systems of equations. (See page 73.)
58 Chapter 3: Symbolic Manipulation