TEXAS INSTRUMENTS
TI-89
TI-92 Plus
Guidebook
for Advanced Mathematics Software Version 2.0
© 1999-2002 Texas Instruments
00_FRONT.DOC TI-89/TI-92 Plus: Front Matter (English) Bob Fedorisko Revised: 02/23/01 10:37 AM Printed: 02/23/01 2:10 PM Page i of 16

Important
Texas Instruments makes no warranty, either expressed or implied, including but not limited to any implied warranties of merchantability and fitness for a particular purpose, regarding any programs or book materials and makes such materials available solely on an "as-is" basis.
In no event shall Texas Instruments be liable to anyone for special, collateral, incidental, or consequential damages in connection with or arising out of the purchase or use of these materials, and the sole and exclusive liability of Texas Instruments, regardless of the form of action, shall not exceed the purchase price of this calculator. Moreover, Texas Instruments shall not be liable for any claim of any kind whatsoever against the use of these materials by any other party.
US FCC Information Concerning Radio Frequency Interference
This equipment has been tested and found to comply with the limits for a Class B digital device, pursuant to Part 15 of the FCC rules. These limits are designed to provide reasonable protection against harmful interference in a residential installation. This equipment generates, uses, and can radiate radio frequency energy and, if not installed and used in accordance with the instructions, may cause harmful interference with radio communications. However, there is no guarantee that interference will not occur in a particular installation.
If this equipment does cause harmful interference to radio or television reception, which can be determined by turning the equipment off and on, you can try to correct the interference by one or more of the following measures:
- Reorient or relocate the receiving antenna.
- Increase the separation between the equipment and receiver.
- Connect the equipment into an outlet on a circuit different from that to which the receiver is connected.
- Consult the dealer or an experienced radio/television technician for help.
Caution: Any changes or modifications to this equipment not expressly approved by Texas Instruments may void your authority to operate the equipment.
TI-89 Shortcut Keys
General
- ◆ APPS: List of Flash applications
- 2nd [←→]: Toggle between last two chosen applications or split screens
- ◆ –, ◆ +: Lighten or darken contrast
- ◆ ENTER: Calculate approximate answer
- ◆ ↑, ◆ ↓: Move cursor to top or bottom (in editors)
- ↑ ↑, ↑ ↓: Scroll tall objects in history
- ↑ ←, ↑ →: Highlight left or right from cursor
- 2nd ↑, 2nd ↓: Page up or page down (in editors)
- 2nd ←, 2nd →: Move cursor far left or far right
On-screen Keyboard Map (◆ EE)
Press ESC to exit the map.

The keyboard map displays shortcuts that are not marked on the keyboard. As shown below, press ◆ and then the applicable key.
- ◆ =: ≠
- ◆ (: Access Greek letters (see next column)
- ◆ ): ● (comment)
- ◆ ,: Copy graph coordinates to sysdata
- ◆ ÷: ! (factorial)
- ◆ I: Display FORMATS dialog box
- ◆ 1 – ◆ 9: Run programs kbdprgm1() through kbdprgm9()
- ◆ ×: & (append)
- ◆ EE: On-screen keyboard map
- ◆ STO►: @
- ◆ ON: Turn off unit so that it returns to current application the next time you turn it on
- ◆ 0 (zero): ≤
- ◆ .: ≥
- ◆ (-): Copy graph coordinates to Home screen history
Alpha Rules
- alpha: Type one lowercase letter
- ↑: Type one uppercase letter
- 2nd [a-lock]: Lowercase alpha lock
- ↑ alpha: Uppercase alpha lock
- alpha: Exit alpha lock
3D Graphing
- ←, →, ↑, ↓: Animate graph
- +, –: Change animation speed
- X, Y, Z: View along axis
- 0: Return to original view
- I: Change graph format style
- ×: Expanded/normal view
Greek Letters
- ◆ (: To access the Greek character set
- ◆ ( alpha + letter: To access lowercase Greek letters. Example: ◆ ( alpha [W] displays ω
- ◆ ( ↑ + letter: To access uppercase Greek letters. Example: ◆ ( ↑ [W] displays Ω
If you press a key combination that does not access a Greek letter, you get the normal letter for that key.

TI-92 Plus Shortcut Keys
General
| Key Combination | Function |
|---|---|
| ◆ APPS | List of Flash applications |
| 2nd [←→] | Toggle between last two chosen applications or split screens |
| ◆ D | Copy graph coordinates to sysdata |
| ◆ F | Display FORMATS dialog box |
| ◆ H | Copy graph coordinates to Home screen history |
| ◆ N | Create new variable |
| ◆ O | Open existing variable |
| ◆ S | Save copy as |
| ◆ –, ◆ + | Lighten or darken contrast |
| ◆ ENTER | Calculate approximate answer |
| ◆ ON | Turn off unit so that it returns to current application the next time you turn it on |
| ◆ 1 – ◆ 9 | Run programs kbdprgm1() through kbdprgm9() |
On-screen Keyboard Map (◆ [KEY])
Press ESC to exit the map.

See the table below for shortcuts that are not marked on the TI-92 Plus keyboard. See the next column for accent marks and Greek letters.
| Key Combination | Function |
|---|---|
| 2nd Q | ? |
| 2nd W | ! (factorial) |
| 2nd R | @ |
| 2nd T | # (indirection) |
| 2nd H | & (append) |
| 2nd X | ● (comment) |
| ◆ = | ≠ |
| ◆ 0 (zero) | ≤ |
| ◆ . | ≥ |
Editing
| Key Combination | Function |
|---|---|
| ◆ ↑ | Move cursor to top |
| ◆ ↓ | Move cursor to bottom |
| 2nd ← | Move cursor to far left |
| 2nd → | Move cursor to far right |
| ◆ ↑, ◆ ↓ | Scroll tall objects in history |
| 2nd ↑, 2nd ↓ | Page up and page down |
| ◆ X | Cut |
| ◆ C | Copy |
| ◆ V | Paste |
3D Graphing
| Key Combination | Function |
|---|---|
| ↑, ↓, ←, → | Animate graph |
| +, – | Change animation speed |
| X, Y, Z | View along axis |
| 0 (zero) | Return to original view |
| F | Change graph format style |
| × | Expanded/normal view |
Accent Marks
| Key Combination | Resulting Characters |
|---|---|
| 2nd A + letter | à, è, ì, ò, ù, À, È, Ì, Ò, Ù |
| 2nd C + letter | ç, Ç |
| 2nd E + letter | á, é, í, ó, ú, ý, Á, É, Í, Ó, Ú, Ý |
| 2nd N + letter | ã, ñ, õ, Ã, Ñ, Õ |
| 2nd O + letter | â, ê, î, ô, û, Â, Ê, Î, Ô, Û |
| 2nd U + letter | ä, ë, ï, ö, ü, ÿ, Ä, Ë, Ï, Ö, Ü |
Greek Letters
| Key Combination | Function |
|---|---|
| 2nd G | To access the Greek character set |
| 2nd G + letter | To access lowercase Greek letters. Example: 2nd G W displays ω |
| 2nd G ↑ + letter | To access uppercase Greek letters. Example: 2nd G ↑ W displays Ω |
If you press a key combination that does not access a Greek letter, you get the normal letter for that key.


Table of Contents
This guidebook describes how to use the TI-89 / TI-92 Plus. The table of contents can help you locate "getting started" information as well as detailed information about the TI-89 / TI-92 Plus features. Appendix A provides one convenient location to find details about every TI-89 / TI-92 Plus function and instruction.
- Flash Applications ........ x
- Keystroke Differences ........ xii
- What's New? ........ xiv
Chapter 1: Getting Started
- Getting the TI-89 Ready to Use ........ 2
- Getting the TI-92 Plus Ready to Use ........ 3
- Setting the Contrast and Selecting a Language ........ 4
- Performing Computations ........ 8
- Graphing a Function ........ 11
Chapter 2: Operating the Calculator
- Turning the TI-89 / TI-92 Plus On and Off ........ 14
- Setting the Display Contrast ........ 15
- The TI-89 Keyboard ........ 16
- The TI-92 Plus Keyboard ........ 17
- Modifier Keys ........ 18
- Entering Alphabetic Characters ........ 21
- Home Screen ........ 23
- Entering Numbers ........ 25
- Entering Expressions and Instructions ........ 26
- Formats of Displayed Results ........ 29
- Editing an Expression in the Entry Line ........ 32
- Menus ........ 34
- Using the Custom Menu ........ 37
- Selecting an Application ........ 38
- Setting Modes ........ 40
- Using the Clean Up Menu to Start a New Problem ........ 43
- Using the Catalog Dialog Box ........ 44
- Storing and Recalling Variable Values ........ 47
- Reusing a Previous Entry or the Last Answer ........ 49
- Auto-Pasting an Entry or Answer from the History Area ........ 52
- Status Line Indicators in the Display ........ 53
- Finding the Software Version and ID Number ........ 55
iii
Chapter 3: Symbolic Manipulation
- Preview of Symbolic Manipulation ........ 58
- Using Undefined or Defined Variables ........ 59
- Using Exact, Approximate, and Auto Modes ........ 61
- Automatic Simplification ........ 64
- Delayed Simplification for Certain Built-In Functions ........ 66
- Substituting Values and Setting Constraints ........ 67
- Overview of the Algebra Menu ........ 70
- Common Algebraic Operations ........ 72
- Overview of the Calc Menu ........ 75
- Common Calculus Operations ........ 76
- User-Defined Functions and Symbolic Manipulation ........ 77
- If You Get an Out-of-Memory Error ........ 79
- Special Constants Used in Symbolic Manipulation ........ 80
Chapter 4: Constants and Measurement Units
- Preview of Constants and Measurement Units ........ 82
- Entering Constants or Units ........ 83
- Converting from One Unit to Another ........ 85
- Setting the Default Units for Displayed Results ........ 87
- Creating Your Own User-Defined Units ........ 88
- List of Pre-Defined Constants and Units ........ 89
Chapter 5: Additional Home Screen Topics
- Saving the Home Screen Entries as a Text Editor Script ........ 94
- Cutting, Copying, and Pasting Information ........ 95
- Creating and Evaluating User-Defined Functions ........ 97
- Using Folders to Store Independent Sets of Variables ........ 100
- If an Entry or Answer Is “Too Big” ........ 103
Chapter 6: Basic Function Graphing
- Preview of Basic Function Graphing ........ 106
- Overview of Steps in Graphing Functions ........ 107
- Setting the Graph Mode ........ 108
- Defining Functions for Graphing ........ 109
- Selecting Functions to Graph ........ 111
- Setting the Display Style for a Function ........ 112
- Defining the Viewing Window ........ 113
- Changing the Graph Format ........ 114
- Graphing the Selected Functions ........ 115
- Displaying Coordinates with the Free-Moving Cursor ........ 116
- Tracing a Function ........ 117
- Using Zooms to Explore a Graph ........ 119
- Using Math Tools to Analyze Functions ........ 122
Chapter 7: Parametric Graphing
- Preview of Parametric Graphing ........ 128
- Overview of Steps in Graphing Parametric Equations ........ 129
- Differences in Parametric and Function Graphing ........ 130
iv
00_FRONT.DOC TI-89/TI-92 Plus: Front Matter (English) Bob Fedorisko Revised: 02/23/01 10:37 AM Printed: 02/23/01 2:10 PM Page iv of 16
Chapter 8: Polar Graphing
- Preview of Polar Graphing ........ 134
- Overview of Steps in Graphing Polar Equations ........ 135
- Differences in Polar and Function Graphing ........ 136
Chapter 9: Sequence Graphing
- Preview of Sequence Graphing ........ 140
- Overview of Steps in Graphing Sequences ........ 141
- Differences in Sequence and Function Graphing ........ 142
- Setting Axes for Time, Web, or Custom Plots ........ 146
- Using Web Plots ........ 147
- Using Custom Plots ........ 150
- Using a Sequence to Generate a Table ........ 151
Chapter 10: 3D Graphing
- Preview of 3D Graphing ........ 154
- Overview of Steps in Graphing 3D Equations ........ 156
- Differences in 3D and Function Graphing ........ 157
- Moving the Cursor in 3D ........ 160
- Rotating and/or Elevating the Viewing Angle ........ 162
- Animating a 3D Graph Interactively ........ 164
- Changing the Axes and Style Formats ........ 165
- Contour Plots ........ 167
- Example: Contours of a Complex Modulus Surface ........ 170
- Implicit Plots ........ 171
- Example: Implicit Plot of a More Complicated Equation ........ 173
Chapter 11: Differential Equation Graphing
- Preview of Differential Equation Graphing ........ 176
- Overview of Steps in Graphing Differential Equations ........ 178
- Differences in Diff Equations and Function Graphing ........ 179
- Setting the Initial Conditions ........ 184
- Defining a System for Higher-Order Equations ........ 186
- Example of a 2nd-Order Equation ........ 187
- Example of a 3rd-Order Equation ........ 189
- Setting Axes for Time or Custom Plots ........ 190
- Example of Time and Custom Axes ........ 191
- Example Comparison of RK and Euler ........ 193
- Example of the deSolve( ) Function ........ 196
- Troubleshooting with the Fields Graph Format ........ 197
v
00_FRONT.DOC TI-89/TI-92 Plus: Front Matter (English) Bob Fedorisko Revised: 02/23/01 10:37 AM Printed: 02/23/01 2:10 PM Page v of 16
Chapter 12: Additional Graphing Topics
- Preview of Additional Graphing Topics ........ 202
- Collecting Data Points from a Graph ........ 203
- Graphing a Function Defined on the Home Screen ........ 204
- Graphing a Piecewise Defined Function ........ 206
- Graphing a Family of Curves ........ 208
- Using the Two-Graph Mode ........ 209
- Drawing a Function or Inverse on a Graph ........ 212
- Drawing a Line, Circle, or Text Label on a Graph ........ 213
- Saving and Opening a Picture of a Graph ........ 217
- Animating a Series of Graph Pictures ........ 219
- Saving and Opening a Graph Database ........ 220
Chapter 13: Tables
- Preview of Tables ........ 222
- Overview of Steps in Generating a Table ........ 223
- Setting Up the Table Parameters ........ 224
- Displaying an Automatic Table ........ 226
- Building a Manual (Ask) Table ........ 229
Chapter 14: Split Screens
- Preview of Split Screens ........ 232
- Setting and Exiting the Split Screen Mode ........ 233
- Selecting the Active Application ........ 235
Chapter 15: Data/Matrix Editor
- Preview of the Data/Matrix Editor ........ 238
- Overview of List, Data, and Matrix Variables ........ 239
- Starting a Data/Matrix Editor Session ........ 241
- Entering and Viewing Cell Values ........ 243
- Inserting and Deleting a Row, Column, or Cell ........ 246
- Defining a Column Header with an Expression ........ 248
- Using Shift and CumSum Functions in a Column Header ........ 250
- Sorting Columns ........ 251
- Saving a Copy of a List, Data, or Matrix Variable ........ 252
Chapter 16: Statistics and Data Plots
- Preview of Statistics and Data Plots ........ 254
- Overview of Steps in Statistical Analysis ........ 258
- Performing a Statistical Calculation ........ 259
- Statistical Calculation Types ........ 261
- Statistical Variables ........ 263
- Defining a Statistical Plot ........ 264
- Statistical Plot Types ........ 266
- Using the Y= Editor with Stat Plots ........ 268
- Graphing and Tracing a Defined Stat Plot ........ 269
- Using Frequencies and Categories ........ 270
- If You Have a CBL 2/CBL or CBR ........ 272
vi
00_FRONT.DOC TI-89/TI-92 Plus: Front Matter (English) Bob Fedorisko Revised: □□/□□/01 10:37 AM Printed: □□/□□/01 2:10 PM Page vi of 16
Chapter 17: Programming
- Preview of Programming ........ 276
- Running an Existing Program ........ 278
- Starting a Program Editor Session ........ 280
- Overview of Entering a Program ........ 282
- Overview of Entering a Function ........ 285
- Calling One Program from Another ........ 287
- Using Variables in a Program ........ 288
- Using Local Variables in Functions or Programs ........ 290
- String Operations ........ 292
- Conditional Tests ........ 294
- Using If, Lbl, and Goto to Control Program Flow ........ 295
- Using Loops to Repeat a Group of Commands ........ 297
- Configuring the TI-89 / TI-92 Plus ........ 300
- Getting Input from the User and Displaying Output ........ 301
- Creating a Custom Menu ........ 303
- Creating a Table or Graph ........ 305
- Drawing on the Graph Screen ........ 307
- Accessing Another TI-89 / TI-92 Plus, a CBL 2/CBL, or a CBR ........ 309
- Debugging Programs and Handling Errors ........ 310
- Example: Using Alternative Approaches ........ 311
- Assembly-Language Programs ........ 313
Chapter 18: Text Editor
- Preview of Text Operations ........ 316
- Starting a Text Editor Session ........ 317
- Entering and Editing Text ........ 319
- Entering Special Characters ........ 324
- Entering and Executing a Command Script ........ 328
- Creating a Lab Report ........ 330
Chapter 19: Numeric Solver
- Preview of the Numeric Solver ........ 334
- Displaying the Solver and Entering an Equation ........ 335
- Defining the Known Variables ........ 337
- Solving for the Unknown Variable ........ 339
- Graphing the Solution ........ 340
Chapter 20: Number Bases
- Preview of Number Bases ........ 344
- Entering and Converting Number Bases ........ 345
- Performing Math Operations with Hex or Bin Numbers ........ 346
- Comparing or Manipulating Bits ........ 347
vii
Chapter 21: Memory and Variable Management
- Preview of Memory and Variable Management ........ 350
- Checking and Resetting Memory ........ 353
- Displaying the VAR-LINK Screen ........ 355
- Manipulating Variables and Folders with VAR-LINK ........ 357
- Pasting a Variable Name to an Application ........ 359
- Archiving and Unarchiving a Variable ........ 360
- If a Garbage Collection Message Is Displayed ........ 362
- Memory Error When Accessing an Archived Variable ........ 364
Chapter 22: Linking and Upgrading
- Linking Two Units ........ 366
- Transmitting Variables, Flash Applications, and Folders ........ 367
- Transmitting Variables under Program Control ........ 371
- Upgrading Product Software (Base Code) ........ 373
- Collecting and Transmitting ID Lists ........ 378
- Compatibility between a TI-89, TI-92 Plus, and TI-92 ........ 380
Chapter 23: Activities
- Analyzing the Pole-Corner Problem ........ 384
- Deriving the Quadratic Formula ........ 386
- Exploring a Matrix ........ 388
- Exploring cos(x) = sin(x) ........ 389
- Finding Minimum Surface Area of a Parallelepiped ........ 390
- Running a Tutorial Script Using the Text Editor ........ 392
- Decomposing a Rational Function ........ 394
- Studying Statistics: Filtering Data by Categories ........ 396
- CBL 2/CBL Program for the TI-89 / TI-92 Plus ........ 399
- Studying the Flight of a Hit Baseball ........ 400
- Visualizing Complex Zeros of a Cubic Polynomial ........ 402
- Solving a Standard Annuity Problem ........ 404
- Computing the Time-Value-of-Money ........ 405
- Finding Rational, Real, and Complex Factors ........ 406
- Simulation of Sampling without Replacement ........ 407
Appendix A: Functions and Instructions
- Quick-Find Locator ........ 410
- Alphabetical Listing of Operations ........ 414
viii
Appendix B: Reference Information
- TI-89 / TI-92 Plus Error Messages ........ 542
- Modes ........ 550
- TI-89 / TI-92 Plus Character Codes ........ 555
- TI-89 Key Codes ........ 556
- TI-92 Plus Key Codes ........ 559
- Entering Complex Numbers ........ 563
- Accuracy Information ........ 566
- System Variables and Reserved Names ........ 567
- EOS (Equation Operating System) Hierarchy ........ 568
- Regression Formulas ........ 570
- Contour Levels and Implicit Plot Algorithm ........ 572
- Runge-Kutta Method ........ 573
Appendix C: Service and Warranty Information
- Battery Information ........ 576
- In Case of Difficulty ........ 579
- Support and Service Information ........ 580
- Warranty Information ........ 581
Appendix D: Programmer’s Guide
-
setMode( ) and getMode( ) ........ 584
-
setGraph( ) ........ 587
-
setTable( ) ........ 589
-
Index ........ 591
TI-89 Shortcut Keys
TI-92 Plus Shortcut Keys
ix
Flash Applications
Applications
Flash functionality enables the ability to download different applications to a TI-89 / TI-92 Plus calculator from the enclosed CD-ROM, the TI web site, or from another calculator.
Before downloading new applications to a TI-89 / TI-92 Plus, please read and accept the license agreement on the TI-89 / TI-92 Plus Applications CD-ROM.
Hardware/Software Requirements
Before installing Flash applications, you will need:
- A computer with a CD-ROM drive and a serial port.
- TI™ Connect or TI-GRAPH LINK™ software and a TI-GRAPH LINK cable. If you need the TI Connect/ TI-GRAPH LINK software or a TI-GRAPH LINK cable, check the TI web site at education.ti.com.
Hardware Setup for the Computer
To set up:
- Insert the small end of the TI-GRAPH LINK cable into the port at the bottom of the TI-89 or the top of the TI-92 Plus.
- Connect the other end to the computer's serial port using a 25-to-9 pin adapter if necessary.
Installing a Flash Application from the CD-ROM
To install an application:
- Insert the TI-89 / TI-92 Plus Applications CD-ROM into the computer's CD-ROM drive.
- From the computer, start the TI-GRAPH LINK software.
- From the Link menu, click Send Flash Software ► Applications and Certificates.
- Locate the Flash application on the CD-ROM and double-click. The Flash application is copied to the calculator.
Note: For further information about transmitting applications to and from your computer using TI Connect, refer to the TI Connect online help.
Running a Flash Application
To run an application:
- On the TI-89 / TI-92 Plus, press [♦] [APPS] to display the FLASH APPLICATIONS menu.
- Use the cursor keys [◄] [►] to highlight the application and press [ENTER].
x
Transferring a Flash Application from another TI-89 / TI-92 Plus
Note: This guidebook uses TI-89 screen shots.
Do not attempt to transfer an application if a low-battery message appears on either the receiving or sending calculator.
- Connect the calculators with the calculator-to-calculator cable that came with the TI-89 / TI-92 Plus.
- On the sending calculator: a. Press [2nd] [VAR-LINK] b. Press: TI-89: [2nd] [F7] TI-92 Plus: [F7] c. Highlight the Flash application and press [F4] (a ✓ is displayed to the left of the selected item)
- On the receiving calculator: a. Press [2nd] [VAR-LINK] b. Press [F3] c. Select: 2:Receive d. Press [ENTER]
- On the sending calculator: a. Press [F3] b. Select: 1:Send to TI-89/92 Plus c. Press [ENTER]
Backing up a Flash Application
Note: For further information about transmitting applications to and from your computer using TI Connect, refer to the TI Connect online help.
To back up an application to the computer:
- On the calculator, press: TI-89: [HOME] TI-92 Plus: [♦] [HOME]
- From the computer, start the TI-GRAPH LINK software
- From the Link menu, click Receive Flash Software
- Select one or more Flash applications and click add
- Click ok
- Save the application to the computer and record this information for future reference.
Deleting a Flash Application
Note: To select all Flash applications, use the [F3] All menu.
To delete a Flash application from the calculator:
- Press [2nd] [VAR-LINK] to display the VAR-LINK screen
- Press: TI-89: [2nd] [F7] TI-92 Plus: [F7]
- Highlight the Flash application and press [F4] (a ✓ is displayed to the left of the selected item)
- Press [F1] and choose 1:Delete — or — Press [←] (a confirmation message appears)
- Press [ENTER] to confirm the deletion.
xi
Keystroke Differences
There are certain differences in keystrokes using the TI-89 / TI-92 Plus for various operations. The following table shows the keystrokes for major commands for the two calculators.
xii
| FUNCTION | TI-89 | TI-92 Plus | |||
|---|---|---|---|---|---|
| SYMBOLS | |||||
| ▶ (Conversion triangle) | [2nd] [▶] | [2nd] [▶] | |||
| _ (Underscore) | ◆ [ _ ] | [2nd] [ _ ] | |||
| θ (Theta) | ◆ [θ] | [θ] | |||
| (“With”) | [ | ] | [2nd] [ | ] | |
| ' (Prime) | [2nd] ['] | [2nd] ['] | |||
| ° (Degree) | [2nd] [°] | [2nd] [°] | |||
| ∠ (Angle) | [2nd] [∠] | [2nd] [∠] | |||
| Σ (Sigma) | CATALOG Σ ( | [2nd] [Σ] | |||
| x⁻¹ (Reciprocal) | CATALOG ^-1 | [2nd] [x⁻¹] | |||
| Space | alpha [ _ ] | Space bar | |||
| HIDDEN SHORTCUTS | |||||
| Place data in sysdata variable | ◆ [ , ] | ◆ D | |||
| Greek characters | ◆ [ ( ] alpha or ◆ [ ( ] ↑ | ◆ G or ◆ G ↑ | |||
| Keyboard map | ◆ [EE] | ◆ [KEY] | |||
| Place data in Home screen history | ◆ [(-)] | ◆ H | |||
| Grave (à, è, ì, ò, ù) | [2nd] [CHAR] 5 | [2nd] A a, e, i, o, u | |||
| Cedilla (ç) | [2nd] [CHAR] 5 6 | [2nd] C c | |||
| Acute (á, é, í, ó, ú, ý) | [2nd] [CHAR] 5 | [2nd] E a, e, i, o, u, y | |||
| Tilde (ã, ñ, õ) | [2nd] [CHAR] 5 6 | [2nd] N a, n, o | |||
| Caret (â, ê, î, ô, û) | [2nd] [CHAR] 5 | [2nd] O a, e, i, o, u | |||
| Umlaut (ä, ë, ï, ö, ü, ÿ) | [2nd] [CHAR] 5 | [2nd] U a, e, i, o, u, y | |||
| ? (Question mark) | [2nd] [CHAR] 3 | [2nd] Q | |||
| β (Beta) | [2nd] [CHAR] 5 6 | [2nd] S | |||
| # (Indirection) | [2nd] [CHAR] 3 | [2nd] T | |||
| & (Append) | ◆ × (times) | [2nd] H | |||
| @ (Arbitrary) | ◆ [STO▶] | [2nd] R | |||
| ≠ (Not equal to symbol) | ◆ = | [2nd] V | |||
| ! (Factorial) | ◆ ÷ | [2nd] W | |||
| Comment (Circle-C) | ◆ [ ) ] ● | [2nd] X ● | |||
| New | [F1] 3 | ◆ N | |||
| Open | [F1] 1 | ◆ O | |||
| Save copy as | [F1] 2 | ◆ S | |||
| Format dialog box | ◆ [ I ] | ◆ F |
xiii
00_FRONT.DOC TI-89/TI-92 Plus: Front Matter (English) Bob Fedorisko Revised: □□/□□/01 10:37 AM Printed: □□/□□/01 2:10 PM Page xiii of 16
What's New?
Introducing Advanced Mathematics Software Version 2.0
TI developed the Advanced Mathematics Software Version 2.0 to enable downloadable calculator software applications for the TI-89 and TI-92 Plus.
Advanced Mathematics Software Version 2.0 is an infrastructure enhancement of the current Advanced Mathematics Software Version 1.xx. It has all the features of Version 1.xx. The improved infrastructure enables multiple downloadable calculator software applications, language localization. This enhancement also provides your new TI-89 / TI-92 Plus with maximum reapportionment of the over 702-KB Flash memory between user data archive and calculator software applications.
All previous TI-89 and TI-92 Plus Modules can be upgraded to Version 2.0. However, on some TI-89 and all TI-92 Plus Module units, the user data archive can only occupy a maximum of 384-KB of the over 702-KB Flash memory shared with calculator software applications.
You can download Advanced Mathematics Software Version 2.0 to your computer from the TI web site at education.ti.com, then transfer it to your TI-89 / TI-92 Plus using the TI™ Connect or TI GRAPH LINK™ software and a TI-GRAPH LINK cable. The Advanced Mathematics Software is free from the TI web site at education.ti.com.
For details, refer to:
Chapter 21 and 22
Language Localization
The TI-89 / TI-92 Plus can be localized into other languages. These free applications translate prompts, error messages, and most functions into one of several languages.
For details, refer to:
Chapter 1
Improved User Interface
The improved user interface allows folder collapse/expand and expands the CATALOG menu to include application functions and user-defined functions.
xiv
Upgradability with Flash ROM
The TI-89 / TI-92 Plus uses Flash technology, which lets you upgrade future software versions without buying a new calculator.
For details, refer to: Chapter 22
As new functionality becomes available, you can electronically upgrade your TI-89 / TI-92 Plus. Future software versions include maintenance upgrades that will be released free of charge, as well as new applications and major future upgrades that will be available for purchase from the TI web site.
To download upgrades from the TI web site, you must have an Internet-connected computer, TI™ Connect or TI-GRAPH LINK™ software, and a TI-GRAPH LINK cable. You can also transfer the product software (operating system) and Flash applications from one TI-89 / TI-92 Plus to another using a unit-to-unit cable, provided that the receiving calculator is also licensed to run that software.
Custom Menu
New to the TI-92 Plus is the custom menu feature that lets you create your own toolbar menu. A custom menu can contain any available function, instruction, or set of characters. The TI-92 Plus has a default custom menu that you can modify or redefine.
xv
00_front.doc TI-89/TI-92 Plus: Front Matter (English) Bob Fedorisko Revised: 01/18/02 2:39 PM Printed: 01/18/02 2:42 PM Page xv of 16
Getting Started
1
- Getting the TI-89 Ready to Use ........ 2
- Getting the TI-92 Plus Ready to Use ........ 3
- Setting the Contrast and Selecting a Language ........ 4
- Performing Computations ........ 8
- Graphing a Function ........ 11
This chapter helps you to get started using the TI-89 / TI-92 Plus quickly. This chapter takes you through several examples to introduce you to some of the principal operating and graphing functions of the TI-89 / TI-92 Plus.

After setting up your TI-89 / TI-92 Plus and completing these examples, please read Chapter 2: Operating the Calculator. You then will be prepared to advance to the detailed information provided in the remaining chapters in this guidebook.
Chapter 1: Getting Started 1

Getting the TI-89 Ready to Use
The TI-89 comes with four AAA batteries. This chapter describes how to install these batteries. It also describes how to turn the unit on for the first time, set the display contrast, select a language, and view the Home screen for both the TI-89 and the TI-92 Plus.
Installing the AAA Batteries
To install the four AAA batteries:
- Place the TI-89 face down on a soft cloth to prevent scratching the display face.
- On the back of the calculator, depress the battery cover latch. Lift and remove the battery cover.
- Remove the batteries from the package and install them in the battery compartment. Arrange the batteries according to the polarity (+ and –) diagram in the battery compartment.
- Replace the battery cover by inserting the two prongs into the two slots at the bottom of the battery compartment, and then push the cover until the latch snaps closed.
Important: When replacing batteries in the future, ensure that the TI-89 is turned off by pressing 2nd [OFF].
To replace the batteries without losing any information stored in memory, follow the directions in Appendix C.

Lithium battery
AAA batteries
2 Chapter 1: Getting Started
Getting the TI-92 Plus Ready to Use
The TI-92 Plus comes with four AA batteries. This chapter describes how to install these batteries. It also describes how to turn the unit on for the first time, set the display contrast, select a language, and view the Home screen for both the TI-92 Plus and the TI-89.
Installing the AA Batteries
To install the four AA alkaline batteries:
- Holding the TI-92 Plus unit upright, slide the latch on the top of the unit to the left unlocked position; slide the rear cover down about one-eighth inch and remove it from the main unit.
Important: When replacing batteries in the future, ensure that the TI-92 Plus is turned off by pressing [2nd] [OFF].
-
Place the TI-92 Plus face down on a soft cloth to prevent scratching the display face.
-
Install the four AA batteries. Be sure to position the batteries according to the diagram inside the unit. The positive (+) terminal of each battery should point toward the top of the unit.
-
Replace the rear cover and slide the latch on the top of the unit to the right locked position to lock the cover back in place.
Chapter 1: Getting Started 3


Setting the Contrast and Selecting a Language
Turning the Unit on and Adjusting the Display Contrast
After you install the batteries in your TI-89 / TI-92 Plus, press [ON]. It is possible that the display contrast may be too dark or too dim to see anything.
To adjust the display to your satisfaction, hold down \diamond (diamond symbol inside a green border) and momentarily press $-$ (minus key) to lighten the display. Hold down \diamond and momentarily press $+$ (plus key) to darken the display.
You will see a screen that lists several languages. The list of languages on your calculator may vary from this example.

Languages other than English are available as Flash applications. English is part of the product software (base code). You may keep as many or as few alternate languages on your calculator as you want (subject to memory limitation) and switch between them easily. During the process, you will be given an opportunity to choose additional languages to keep or delete. You may also add or delete language applications through the VAR-LINK screen.
Important Information About the Language Process
The TI-89 / TI-92 Plus can be localized into one of several languages. Localizing means that all menu names, dialog boxes, error messages, etc., will display in the language of your choice.
The TI-89 / TI-92 Plus can be localized into only one language at a time; however, you can keep additional languages on the unit and switch the language at any time.
The initial localization of the TI-89 / TI-92 Plus occurs in three phases:
- Phase I - Select the language in which you would like to localize the TI-89 / TI-92 Plus. Future online instructions will appear in the selected language.
- Phase II - Read the instructional message that appears in the language you selected in Phase I.
- Phase III - The TI-89 / TI-92 Plus is localized into the language you selected in Phase I. You can now select one or more language applications that you would like to keep on the calculator (in case you want to switch to another language later). You can always reload one or more language applications later, if necessary. The calculator will then automatically delete the unselected languages.
Note: English cannot be deleted and remains available in the product software (base code).
4 Chapter 1: Getting Started
Localizing the TI-89 / TI-92 Plus
- Press the cursor keys (◄ or ►) to move the pointer to the language in which you would like to set your TI-89 / TI-92 Plus. (The list of languages on your calculator may vary from this example.)
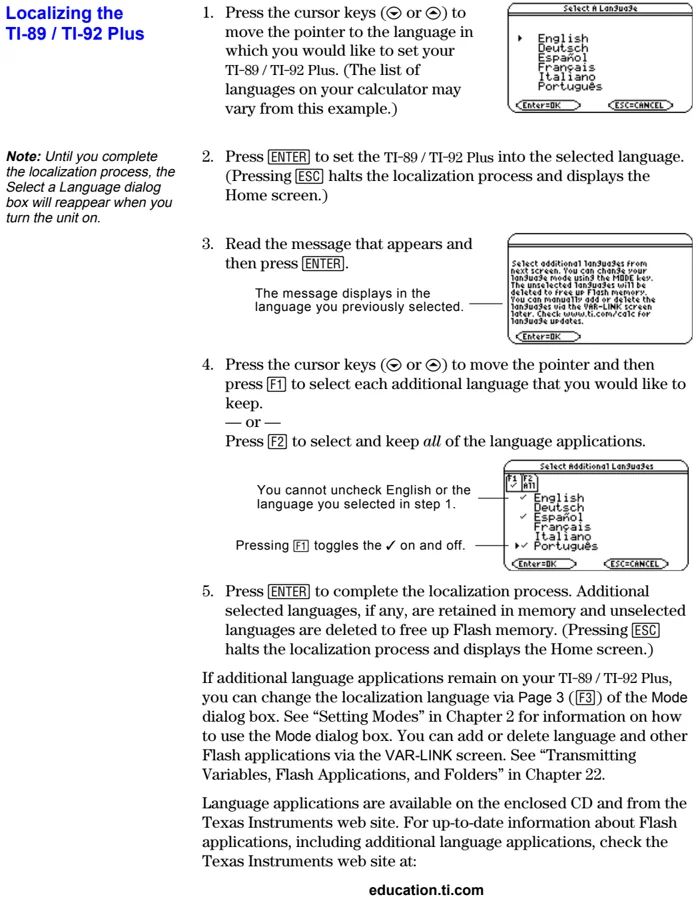
- Press [ENTER] to set the TI-89 / TI-92 Plus into the selected language. (Pressing [ESC] halts the localization process and displays the Home screen.)
Note: Until you complete the localization process, the Select a Language dialog box will reappear when you turn the unit on.
-
Read the message that appears and then press [ENTER]. The message displays in the language you previously selected.
-
Press the cursor keys (◄ or ►) to move the pointer and then press [F1] to select each additional language that you would like to keep. — or — Press [F2] to select and keep all of the language applications. You cannot uncheck English or the language you selected in step 1. Pressing [F1] toggles the ✓ on and off.
-
Press [ENTER] to complete the localization process. Additional selected languages, if any, are retained in memory and unselected languages are deleted to free up Flash memory. (Pressing [ESC] halts the localization process and displays the Home screen.)
If additional language applications remain on your TI-89 / TI-92 Plus, you can change the localization language via Page 3 ([F3]) of the Mode dialog box. See “Setting Modes” in Chapter 2 for information on how to use the Mode dialog box. You can add or delete language and other Flash applications via the VAR-LINK screen. See “Transmitting Variables, Flash Applications, and Folders” in Chapter 22.
Language applications are available on the enclosed CD and from the Texas Instruments web site. For up-to-date information about Flash applications, including additional language applications, check the Texas Instruments web site at:
education.ti.com
Chapter 1: Getting Started 5
About the Home Screen
After you select a language, a blank Home screen is displayed.
The Home screen lets you execute instructions, evaluate expressions, and view results.

The following example contains previously entered data and describes the main parts of the Home screen. Entry/answer pairs in the history area are displayed in “pretty print.” Pretty print displays expressions in the same form in which they are written on the board or in textbooks.
History Area Lists entry/answer pairs you have entered. Pairs scroll up the screen as you make new entries.
Toolbar Lets you display menus for selecting operations applicable to the Home screen. To display a toolbar menu, press F1, F2, etc.
Last Entry Your last entry.
Entry Line Where you enter expressions or instructions.
Last Answer Result of your last entry. Note that results are not displayed on the entry line.
Status Line Shows the current state of the calculator.
6 Chapter 1: Getting Started

The following example shows an answer that is not on the same line as the expression. Note that the answer is longer than the screen width. An arrow (►) indicates the answer is continued. The entry line contains ellipsis (...). Ellipsis indicates the entry is longer than the screen width.
Last Entry "Pretty print" is ON. Exponents, roots, fractions, etc., are displayed in the same form in which they are traditionally written.

Answer Continues Highlight the answer and press ◂ to scroll right and view the rest of it. Note that the answer is not on the same line as the expression.
Expression Continues Press ◂ to scroll right and view the rest of the entry. Press 2nd ◂ or 2nd ▸ to go to the beginning or end of the entry line.
Turning the TI-89 / TI-92 Plus Off
When you want to turn the TI-89 / TI-92 Plus off, press [2nd] [OFF]. (Note: [OFF] is the second function of the [ON] key.)
Chapter 1: Getting Started 7
Performing Computations
This section provides several examples for you to perform that demonstrate some of the computational features of the TI-89 / TI-92 Plus. The history area in each screen was cleared by pressing [F1] and selecting 8:Clear Home, before performing each example, to illustrate only the results of the example’s keystrokes.
| Steps | TI-89 Keystrokes | TI-92 Plus Keystrokes | Display |
|---|---|---|---|
| Showing Computations | |||
| 1. Compute sin(π/4) and display the result in symbolic and numeric format.To clear the history area of previous calculations, press [F1] and select 8:Clear Home. | [2nd] [SIN] [2nd] [π] [÷] 4 [ ) ] [ENTER] [♦] [ENTER] | [SIN] [2nd] [π] [÷] 4 [ ) ] [ENTER] [♦] [ENTER] | |
| Finding the Factorial of Numbers | |||
| 1. Compute the factorial of several numbers to see how the TI-89 / TI-92 Plus handles very large integers.To get the factorial operator (!), press [2nd] [MATH], select 7:Probability, and then select 1:! . | 5 [2nd] [MATH] 7 1 [ENTER] 2 0 [2nd] [MATH] 7 1 [ENTER] 3 0 [2nd] [MATH] 7 1 [ENTER] | 5 [2nd] W [ENTER] 2 0 [2nd] W [ENTER] 3 0 [2nd] W [ENTER] | |
| Expanding Complex Numbers | |||
| 1. Compute (3+5i)³ to see how the TI-89 / TI-92 Plus handles computations involving complex numbers. | [ ( ] 3 [ + ] 5 [2nd] [ i ] [ ) ] [ ^ ] 3 [ENTER] | [ ( ] 3 [ + ] 5 [2nd] [ i ] [ ) ] [ ^ ] 3 [ENTER] | |
| Finding Prime Factors | |||
| 1. Compute the factors of the rational number 2634492.You can enter “factor” on the entry line by typing FACTOR on the keyboard, or by pressing [F2] and selecting 2:factor(.2. (Optional) Enter other numbers on your own. | [F2] 2 2 6 3 4 4 9 2 [ ) ] [ENTER] | [F2] 2 2 6 3 4 4 9 2 [ ) ] [ENTER] |
8 Chapter 1: Getting Started
