Chapter 17: Programming 277
| Steps | TI-89 Keystrokes | TI-92 Plus Keystrokes | Display |
|---|---|---|---|
| 5. Go to the Home screen. Enter the program name, followed by a set of parentheses.You must include ( ) even when there are no arguments for the program.The program displays a dialog box with the prompt specified in the program. | [HOME][2nd] [a-lock] P R O G[alpha] 1[ ( ) ] [ENTER] | ◆ [HOME]P R O G1[ ( ) ] [ENTER] | prog1() |
| 6. Type 5 in the displayed dialog box. | 5 | 5 | |
| 7. Continue with the program. The Disp command displays the result on the Program I/O screen.The result is the sum of the integers from 1 through 5.Although the Program I/O screen looks similar to the Home screen, it is for program input and output only. You cannot perform calculations on the Program I/O screen. | [ENTER] [ENTER] | [ENTER] [ENTER] | |
| 8. Leave the Program I/O screen and return to the Home screen.You can also press [ESC], [2nd] [QUIT], orTI-89: [HOME]TI-92 Plus: ◆[HOME]to return to the Home screen. | [F5] | [F5] |

Running an Existing Program
After a program is created (as described in the remaining sections of this chapter), you can run it from the Home screen. The program’s output, if any, is displayed on the Program I/O screen, in a dialog box, or on the Graph screen.
Running a Program
On the Home screen:
- Type the name of the program.
- You must always type a set of parentheses after the name.
Some programs require you to pass an argument to the program.
- Press [ENTER].
When you run a program, the TI-89 / TI-92 Plus automatically checks for errors. For example, the following message is displayed if you:
• Do not enter () after the program name.
This error message appears if you:
• Do not enter enough arguments, if required.
To cancel program execution if an error occurs, press [ESC]. You can then correct any problems and run the program again.
Tip: Use [2nd] [VAR-LINK] to list existing PRGM variables. Highlight a variable and press [ENTER] to paste its name to the entry line.
Note: Arguments specify initial values for a program. Refer to page 283.
Note: The TI-89 / TI-92 Plus also checks for run-time errors that are found within the program itself. Refer to page 310.
"Breaking" a Program
When a program is running, the BUSY indicator is displayed in the status line.
Press [ON] to stop program execution. A message is then displayed.
• To display the program in the Program Editor, press [ENTER]. The cursor appears at the command where the break occurred.
• To cancel program execution, press [ESC].
278 Chapter 17: Programming


Where Is the Output Displayed?
Depending on the commands in the program, the TI-89 / TI-92 Plus automatically displays information on the applicable screen.
• Most output and input commands use the Program I/O screen. (Input commands prompt the user to enter information.)
• Graph-related commands typically use the Graph screen.
After the program stops, the TI-89 / TI-92 Plus shows the last screen that was displayed.
The Program I/O Screen
On the Program I/O screen, new output is displayed below any previous output (which may have been displayed earlier in the same program or a different program). After a full page of output, the previous output scrolls off the top of the screen.
Tip: To clear any previous output, enter the ClrIO command in your program. You can also execute ClrIO from the Home screen.
Last output
On the Program I/O screen: • F5 toolbar is available; all others are dimmed. • There is no entry line.
Tip: If Home screen calculations don't work after you run a program, you may be on the Program I/O screen.
When a program stops on the Program I/O screen, you need to recognize that it is not the Home screen (although the two screens are similar). The Program I/O screen is used only to display output or to prompt the user for input. You cannot perform calculations on this screen.
Leaving the Program I/O Screen
From the Program I/O screen:
• Press F5 to toggle between the Home screen and the Program I/O screen. — or — • Press ESC, 2nd [QUIT], or TI-89: [HOME] TI-92 Plus: [♦][HOME] to display the Home screen. — or — • Display any other application screen (with [APPS], [♦][Y=], etc.).
Chapter 17: Programming 279


Starting a Program Editor Session
Each time you start the Program Editor, you can resume the current program or function (that was displayed the last time you used the Program Editor), open an existing program or function, or start a new program or function.
Starting a New Program or Function
- Press
[APPS]and then select 7:Program Editor. - Select 3:New.
- Specify the applicable information for the new program or function.
| Item | Lets you: |
|---|---|
| Type | Select whether to create a new program or function. |
| Folder | Select the folder in which the new program or function will be stored. For information about folders, refer to Chapter 5. |
| Variable | Type a variable name for the program or function. If you specify a variable that already exists, an error message will be displayed when you press [ENTER]. When you press [ESC] or [ENTER] to acknowledge the error, the NEW dialog box is redisplayed. |
- Press
[ENTER](after typing in an input box such as Variable, you must press[ENTER]twice) to display an empty “template.”
Note: A program (or function) is saved automatically as you type. You do not need to save it manually before leaving the Program Editor, starting a new program, or opening a previous one.
This is the template for a program. Functions have a similar template.
You can now use the Program Editor as described in the remaining sections of this chapter.
280 Chapter 17: Programming


You can leave the Program Editor and go to another application at any time. To return to the program or function that was displayed when you left the Program Editor, press \boxedAPPS 7 and select 1:Current.
To leave the current program or function and start a new one:
- Press \boxedF1 and select 3:New.
- Specify the type, folder, and variable for the new program or function.
- Press \boxedENTER twice.
You can open a previously created program or function at any time.
- From within the Program Editor, press \boxedF1 and select 1:Open. — or — From another application, press \boxedAPPS 7 and select 2:Open.
- Select the applicable type, folder, and variable.
- Press \boxedENTER.
Note: By default, Variable shows the first existing program or function in alphabetical order.
In some cases, you may want to copy a program or function so that you can edit the copy while retaining the original.
- Display the program or function you want to copy.
- Press \boxedF1 and select 2:Save Copy As.
- Specify the folder and variable for the copy.
- Press \boxedENTER twice.
Because all Program Editor sessions are saved automatically, you can accumulate quite a few previous programs and functions, which take up memory storage space.
To delete programs and functions, use the VAR-LINK screen (\boxed2nd [\boxedVAR-LINK]). For information about VAR-LINK, refer to Chapter 21.
Chapter 17: Programming 281


Overview of Entering a Program
A program is a series of commands executed in sequential order (although some commands alter the program flow). In general, anything that can be executed from the Home screen can be included in a program. Program execution continues until it reaches the end of the program or a Stop command.
Entering and Editing Program Lines
On a blank template, you can begin entering commands for your new program.
Program name, which you specify when you create a new program.
Enter your program commands between Prgm and EndPrgm.
All program lines begin with a colon.

Note: Use the cursor pad to scroll through the program for entering or editing commands. Use \blacktriangleright \triangleleft or \blacktriangledown \blacktriangle to go to the top or bottom of a program, respectively.
You enter and edit program commands in the Program Editor by using the same techniques used to enter and edit text in the Text Editor. Refer to "Entering and Editing Text" in Chapter 18.
After typing each program line, press [ENTER]. This inserts a new blank line and lets you continue entering another line. A program line can be longer than one line on the screen; if so, it will wrap to the next screen line automatically.
Note: Entering a command does not execute that command. It is not executed until you run the program.
Entering Multi-Command Lines
To enter more than one command on the same line, separate them with a colon by pressing [2nd][:].
Entering Comments
A comment symbol (\bullet) lets you enter a remark in a program. When you run the program, all characters to the right of \bullet are ignored.
Tip: Use comments to enter information that is useful to someone reading the program code.
Description of the program. Description of expr.
:prog1() :Prgm :●Displays sum of 1 thru n :Request "Enter an integer",n :expr(n)→n:●Convert to numeric expression :------
To enter the comment symbol, press:
- TI-89: \blacktriangleright [ ] TI-92 Plus: [2nd] X — or —
- Press [F2] and select 9:\bullet
282 Chapter 17: Programming

Controlling the Flow of a Program
When you run a program, the program lines are executed in sequential order. However, some commands alter the program flow. For example:
- Control structures such as If...EndIf commands use a conditional test to decide which part of a program to execute.
- Loops commands such as For...EndFor repeat a group of commands.
Tip: For information, refer to pages 295 and 297.
Using Indentation
For more complex programs that use If...EndIf and loop structures such as For...EndFor, you can make the programs easier to read and understand by using indentation.
:If x>5 Then : Disp "x is > 5" :Else : Disp "x is < or = 5" :EndIf
Displaying Calculated Results
In a program, calculated results are not displayed unless you use an output command. This is an important difference between performing a calculation on the Home screen and in a program.
These calculations will not display a result in a program (although they will on the Home screen).
:12*6 :cos(π/4) :solve(x^2- x- 2=0,x)
Tip: For a list of available output commands, refer to page 302.
Output commands such as Disp will display a result in a program.
:Disp 12*6 :Disp cos(π/4) :Disp solve(x^2- x- 2=0,x)
Displaying a calculation result does not store that result. If you need to refer to a result later, store it to a variable.
:cos(π/4)►maximum :Disp maximum
Getting Values into a Program
To input values into a program, you can:
- Require the users to store a value (with STO►) to the necessary variables before running the program. The program can then refer to these variables.
- Enter the values directly into the program itself. :Disp 12*6 :cos(π/4)►maximum
- Include input commands that prompt the users to enter the necessary values when they run the program. :Input "Enter a value",i :Request "Enter an integer",n
Tip: For a list of available input commands, refer to page 301.
- Require the users to pass one or more values to the program when they run it. prog1(3,5)
Chapter 17: Programming 283
Example of Passing Values to a Program
The following program draws a circle on the Graph screen and then draws a horizontal line across the top of the circle. Three values must be passed to the program: x and y coordinates for the circle’s center and the radius r.
Note: In this example, you cannot use circle as the program name because it conflicts with a command name.
- When you write the program in the Program Editor:
In the ( ) beside the program name, specify the variables that will be used to store the passed values.
Notice that the program also contains commands that set up the Graph screen.
:circ(x,y,r) :Prgm :FnOff :ZoomStd :ZoomSqr :Circle x,y,r :LineHorz y+r :EndPrgm
Only circ( ) is initially displayed on the blank template; be sure to edit this line.
Before drawing the circle, the program turns off any selected Y= Editor functions, displays a standard viewing window, and “squares” the window.
Note: This example assumes that the user enters values that can be displayed by the viewing window set up by ZoomStd and ZoomSqr.
- To run the program from the Home screen:
The user must specify the applicable values as arguments within the ( ).
The arguments, in order, are passed to the program.
284 Chapter 17: Programming


Overview of Entering a Function
A function created in the Program Editor is very similar to the functions and instructions that you typically use from the Home screen.
Why Create a User-Defined Function?
Functions (as well as programs) are ideal for repetitive calculations or tasks. You only need to write the function once. Then you can reuse it as many times as necessary. Functions, however, have some advantages over programs.
Note: You can create a function from the Home screen (see Chapter 5), but the Program Editor is more convenient for complex, multi-line functions.
- You can create functions that expand on the TI-89 / TI-92 Plus's built-in functions. You can then use the new functions the same as any other function.
- Functions return values that can be graphed or entered in a table; programs cannot.
- You can use a function (but not a program) within an expression. For example: 3func1(3) is valid, but not 3prog1(3).
- Because you pass arguments to a function, you can write generic functions that are not tied to specific variable names.
Differences Between Functions and Programs
This guidebook sometimes uses the word command as a generic reference to instructions and functions. When writing a function, however, you must differentiate between instructions and functions.
A user-defined function:
- Can use the following instructions only. Any others are invalid.
\begin{tabular}{lll} Cycle & Define & Exit \ For...EndFor & Goto & If...EndIf (all forms) \ Lbl & Local & Loop...EndLoop \ Return & While...EndWhile & \rightarrow (\textbf{STO} key) \ \end{tabular}
- Can use all built-in TI-89 / TI-92 Plus functions except:
\begin{tabular}{lll} setFold & setGraph & setMode \ setTable & switch & \ \end{tabular}
Tip: For information about local variables, refer to pages 288 and 290.
- Can refer to any variable; however, it can store a value to a local variable only.
- The arguments used to pass values to a function are treated as local variables automatically. If you store to any other variables, you must declare them as local from within the function.
- Cannot call a program as a subroutine, but it can call another user-defined function.
- Cannot define a program.
- Cannot define a global function, but it can define a local function.
Chapter 17: Programming 285
Entering a Function
When you create a new function in the Program Editor, the TI-89 / TI-92 Plus displays a blank “template”.
Function name, which you specify when you create a new function.
Enter your commands between Func and EndFunc.
All function lines begin with a colon.

Note: Use the cursor pad to scroll through the function for entering or editing commands.
If the function requires input, one or more values must be passed to the function. (A user-defined function can store to local variables only, and it cannot use instructions that prompt the user for input.)
How to Return a Value from a Function
There are two ways to return a value from a function:
-
As the last line in the function (before EndFunc), calculate the value to be returned.
:cube(x) :Func :x^3 :EndFunc
-
Use Return. This is useful for exiting a function and returning a value at some point other than the end of the function.
:cube(x) :Func :If x<0 : Return 0 :x^3 :EndFunc
Note: This example calculates the cube if x≥0; otherwise, it returns a 0.
The argument x is automatically treated as a local variable. However, if the example needed another variable, the function would need to declare it as local by using the Local command (pages 288 and 290).
There is an implied Return at the end of the function. If the last line is not an expression, an error occurs.
Example of a Function
The following function returns the xth root of a value y (\sqrt[x]y). Two values must be passed to the function: x and y.
| Function as called from the Home Screen | Function as defined in the Program Editor |
|---|---|
| 3→x:125→y | :xroot(x,y) |
| 4*xroot(3,125) | :Func |
| 20 | :y^(1/x) |
| :EndFunc | |
| 5 |
Note: Because x and y in the function are local, they are not affected by any existing x or y variable.
286 Chapter 17: Programming


Calling One Program from Another
One program can call another program as a subroutine. The subroutine can be external (a separate program) or internal (included in the main program). Subroutines are useful when a program needs to repeat the same group of commands at several different places.
Calling a Separate Program
To call a separate program, use the same syntax used to run the program from the Home screen.
:subtest1() :Prgm :For i,1,4,1 : subtest2(i,i*1000) :EndFor :EndPrgm
:subtest2(x,y) :Prgm : Disp x,y :EndPrgm
Calling an Internal Subroutine
To define an internal subroutine, use the Define command with Prgm...EndPrgm. Because a subroutine must be defined before it can be called, it is a good practice to define subroutines at the beginning of the main program.
An internal subroutine is called and executed in the same way as a separate program.
Tip: Use the Program Editor's F4 Var toolbar menu to enter the Define and Prgm...EndPrgm commands.
Declares the subroutine as a local variable. Defines the subroutine. Calls the subroutine.
:subtest1() :Prgm :local subtest2 :Define subtest2(x,y)=Prgm : Disp x,y :EndPrgm :●Beginning of main program :For i,1,4,1 : subtest2(i,i*1000) :EndFor :EndPrgm
Notes about Using Subroutines
At the end of a subroutine, execution returns to the calling program. To exit a subroutine at any other time, use the Return command.
A subroutine cannot access local variables declared in the calling program. Likewise, the calling program cannot access local variables declared in a subroutine.
Lbl commands are local to the programs in which they are located. Therefore, a Goto command in the calling program cannot branch to a label in a subroutine or vice versa.
Chapter 17: Programming 287


Using Variables in a Program
Programs use variables in the same general way that you use them from the Home screen. However, the “scope” of the variables affects how they are stored and accessed.
Scope of Variables
| Scope | Description |
|---|---|
| System (Global) Variables | Variables with reserved names that are created automatically to store data about the state of the TI-89 / TI-92 Plus. For example, Window variables (xmin, xmax, ymin, ymax, etc.) are globally available from any folder.• You can always refer to these variables by using the variable name only, regardless of the current folder.• A program cannot create system variables, but it can use the values and (in most cases) store new values. |
| Folder Variables | Variables that are stored in a particular folder.• If you store to a variable name only, it is stored in the current folder. For example:5→start• If you refer to a variable name only, that variable must be in the current folder. Otherwise, it cannot be found (even if the variable exists in a different folder).• To store or refer to a variable in another folder, you must specify a path name. For example:5→class\start└─ Variable name└─ Folder nameAfter the program stops, any folder variables created by the program still exist and still take up memory. |
| Local Variables | Temporary variables that exist only while a program is running. When the program stops, local variables are deleted automatically.• To create a local variable in a program, use the Local command to declare the variable.• A local variable is treated as unique even if there is an existing folder variable with the same name.• Local variables are ideal for temporarily storing values that you do not want to save. |
Note: For information about folders, refer to Chapter 5.
Note: If a program has local variables, a graphed function cannot access them. For example: Local a 5→a Graph a* cos(x) may display an error or an unexpected result (if a is an existing variable in the current folder).
288 Chapter 17: Programming

Circular Definition Errors
When evaluating a user-defined function or running a program, you can specify an argument that includes the same variable that was used to define the function or create the program. However, to avoid Circular definition errors, you must assign a value for x or i variables that are used in evaluating the function or running the program. For example:
x+1→x – or – For i,i,10,1 Disp i EndFor
Causes a Circular definition error message if x or i does not have a value. The error does not occur if x or i has already been assigned a value.
Variable-Related Commands
Note: The Define, DelVar, and Local commands are available from the Program Editor's F4 Var toolbar menu.
\begin{tabular}{ll} \hline Command & Description \ \hline STO key & Stores a value to a variable. As on the Home screen, pressing STO enters a \rightarrow symbol. \ Archive & Moves specified variables from RAM to user data archive memory. \ BldData & Lets you create a data variable based on the graph information entered in the Y=Editor, Window Editor, etc. \ CopyVar & Copies the contents of a variable. \ Define & Defines a program (subroutine) or function variable within a program. \ DelFold & Deletes a folder. All variables in that folder must be deleted first. \ DelVar & Deletes a variable. \ getFold & Returns the name of the current folder. \ getType & Returns a string that indicates the data type (EXPR, LIST, etc.) of a variable. \ Local & Declares one or more variables as local variables. \ Lock & Locks a variable so that it cannot be accidentally changed or deleted without first being unlocked. \ MoveVar & Moves a variable from one folder to another. \ NewData & Creates a data variable whose columns consist of a series of specified lists. \ NewFold & Creates a new folder. \ NewPic & Creates a picture variable based on a matrix. \ Rename & Renames a variable. \ Unarchiv & Moves specified variables from user data archive memory to RAM. \ Unlock & Unlocks a locked variable. \ \hline \end{tabular}
Chapter 17: Programming 289

Using Local Variables in Functions or Programs
A local variable is a temporary variable that exists only while a user-defined function is being evaluated or a user-defined program is running.
Example of a Local Variable
Tip: As often as possible, use local variables for any variable that is used only within a program and does not need to be stored after the program stops.
The following program segment shows a For...EndFor loop (which is discussed later in this chapter). The variable i is the loop counter. In most cases, the variable i is used only while the program is running.
Declares variable i as local. :Local i :For i,0,5,1 : Disp i :EndFor :Disp i
If you declare variable i as local, it is deleted automatically when the program stops so that it does not use up memory.
What Causes an Undefined Variable Error Message?
An Undefined variable error message displays when you evaluate a user-defined function or run a user-defined program that references a local variable that is not initialized (assigned a value).
This example is a multi-statement function, rather than a program. Line breaks are shown here, but you would type the text in the entry line as one continuous line, such as: Define fact(n)=Func:Local... where the ellipsis indicates the entry line text continues off-screen.
For example:
Define fact(n)=Func: Local m: While n>1: n*m→m: n-1→n: EndWhile: Return m: EndFunc
Local variable m is not assigned an initial value.
In the example above, the local variable m exists independently of any variable m that exists outside of the function.
You Must Initialize Local Variables
All local variables must be assigned an initial value before they are referenced.
Define fact(n)=Func: Local m: 1→m: While n>1: n*m→m: n-1→n: EndWhile: Return m: EndFunc
1 is stored as the initial value for m.
The TI-89 / TI-92 Plus cannot use a local variable to perform symbolic calculations.
290 Chapter 17: Programming
To Perform Symbolic Calculations
If you want a function or program to perform symbolic calculations, you must use a global variable instead of a local. However, you must be certain that the global variable does not already exist outside of the program. The following methods can help.
• Refer to a global variable name, typically with two or more characters, that is not likely to exist outside of the function or program.
• Include DelVar within the function or program to delete the global variable, if it exists, before referring to it. (DelVar does not delete locked or archived variables.)
Chapter 17: Programming 291
String Operations
Strings are used to enter and display text characters. You can type a string directly, or you can store a string to a variable.
How Strings Are Used
A string is a sequence of characters enclosed in "quotes". In programming, strings allow the program to display information or prompt the user to perform some action. For example:
Disp "The result is",answer — or — Input "Enter the angle in degrees",ang1 — or — "Enter the angle in degrees"→str1 Input str1,ang1
Some input commands (such as InputStr) automatically store user input as a string and do not require the user to enter quotation marks.
A string cannot be evaluated mathematically, even if it appears to be a numeric expression. For example, the string "61" represents the characters "6" and "1", not the number 61.
Although you cannot use a string such as "61" or "2x+4" in a calculation, you can convert a string into a numeric expression by using the expr command.
292 Chapter 17: Programming
String Commands
Note: See Appendix A for syntax for all TI-89 / TI-92 Plus commands and functions.
\begin{tabular}{ll} \hline Command & Description \ \hline # & Converts a string into a variable name. This is called indirection. \ & & Appends (concatenates) two strings into one string. \ char & Returns the character that corresponds to a specified character code. This is the opposite of the ord command. \ dim & Returns the number of characters in a string. \ expr & Converts a string into an expression and executes that expression. This is the opposite of the string command. \ & \textbf{Important:} Some user input commands store the entered value as a string. Before you can perform a mathematical operation on that value, you must convert it to a numeric expression. \ format & Returns an expression as a character string based on the format template (fixed, scientific, engineering, etc.) \ inString & Searches a string to see if it contains a specified substring. If so, inString returns the character position where the first occurrence of the substring begins. \ left & Returns a specified number of characters from the left side (beginning) of a string. \ mid & Returns a specified number of characters from any position within a string. \ ord & Returns the character code of the first character within a string. This is the opposite of the char command. \ right & Returns a specified number of characters from the right side (end) of a string. \ rotate & Rotates the characters in a string. The default is -1 (rotate right one character). \ shift & Shifts the characters in a string and replaces them with spaces. The default is -1 (shift right one character and replace with one space). Examples: shift("abcde",2)\Rightarrow"cde " and shift("abcde")\Rightarrow" abcd" \ string & Converts a numeric expression into a string. This is the opposite of the expr command. \ \hline \end{tabular}
Chapter 17: Programming 293
Conditional Tests
Conditional tests let programs make decisions. For example, depending on whether a test is true or false, a program can decide which of two actions to perform. Conditional tests are used with control structures such as If...EndIf and loops such as While...EndWhile (described later in this chapter).
Entering a Test Operator
- Type the operator directly from the keyboard. — or —
- Press [2nd] [MATH] and select 8:Test. Then select the operator from the menu. — or —
- Display the built-in functions. Press: TI-89: [CATALOG] TI-92 Plus: [2nd] [CATALOG] The test operators are listed near the bottom of the [F2] Built-in menu.

Relational Tests
Relational operators let you define a conditional test that compares two values. The values can be numbers, expressions, lists, or matrices (but they must match in type and dimension).
| Operator | True if: | Example |
|---|---|---|
| > | Greater than | a>8 |
| < | Less than | a<0 |
| ≥ | Greater than or equal to | a+b≥100 |
| ≤ | Less than or equal to | a+6≤b+1 |
| = | Equal | list1=list2 |
| ≠ | Not equal to | mat1≠mat2 |
Tip: From the keyboard, you can type:
= for ≥ <= for ≤ /= for ≠ (To get the / character, press [÷].)
Boolean Tests
Boolean operators let you combine the results of two separate tests.
| Operator | True if: | Example |
|---|---|---|
| and | Both tests are true | a>0 and a≤10 |
| or | At least one test is true | a≤0 or b+c>10 |
| xor | One test is true and the other is false | a+6<b+1 xor c<d |
The Not Function
The not function changes the result of a test from true to false and vice versa. For example:
not x>2 is true if x≤2 false if x>2
Note: If you use not from the Home screen, it is shown as ~ in the history area. For example, not x>2 is shown as ~(x>2).
294 Chapter 17: Programming
Using If, Lbl, and Goto to Control Program Flow
An If...EndIf structure uses a conditional test to decide whether or not to execute one or more commands. Lbl (label) and Goto commands can also be used to branch (or jump) from one place to another in a program.
F2 Control Toolbar Menu To enter If...EndIf structures, use the Program Editor's F2 Control toolbar menu.
The If command is available directly from the F2 menu.
To see a submenu that lists other If structures, select 2:If...Then.
When you select a structure such as If...Then...EndIf, a template is inserted at the cursor location.
:If | Then
:EndIf
The cursor is positioned so that you can enter a conditional test.
If Command To execute only one command if a conditional test is true, use the general form:
Tip: Use indentation to make your programs easier to read and understand.
Executed only if x>5; otherwise, skipped. Always displays the value of x.
:If x>5 : Disp "x is greater than 5" :Disp x
In this example, you must store a value to x before executing the If command.
If...Then...EndIf Structures To execute multiple commands if a conditional test is true, use the structure:
Note: EndIf marks the end of the Then block that is executed if the condition is true.
Executed only if x>5. Displays value of: • 2x if x>5. • x if x≤5.
:If x>5 Then : Disp "x is greater than 5" : 2*x→x :EndIf :Disp x
Chapter 17: Programming 295


If...Then...Else... EndIf Structures
To execute one group of commands if a conditional test is true and a different group if the condition is false, use this structure:
Executed only if x>5. Executed only if x≤5. Displays value of: • 2x if x>5. • 5x if x≤5.
:If x>5 Then : Disp "x is greater than 5" : 2* x→x :Else : Disp "x is less than or : equal to 5" : 5* x→x :EndIf :Disp x
If...Then...Elseif... EndIf Structures
A more complex form of the If command lets you test a series of conditions. Suppose your program prompts the user for a number that corresponds to one of four options. To test for each option (If Choice=1, If Choice = 2, etc.), use the If...Then...Elseif...EndIf structure.
Refer to Appendix A for more information and an example.
Lbl and Goto Commands
You can also control the flow of your program by using Lbl (label) and Goto commands.
Use the Lbl command to label (assign a name to) a particular location in the program.
Lbl labelName
name to assign to this location (use the same naming convention as a variable name)
You can then use the Goto command at any point in the program to branch to the location that corresponds to the specified label.
Goto labelName
specifies which Lbl command to branch to
Because a Goto command is unconditional (it always branches to the specified label), it is often used with an If command so that you can specify a conditional test. For example:
If x>5, branches directly to label GT5.
For this example, the program must include commands (such as Stop) that prevent Lbl GT5 from being executed if x≤5.
:If x>5 : Goto GT5 :Disp x ;--------- ;--------- :Lbl GT5 :Disp "The number was > 5"
296 Chapter 17: Programming


Using Loops to Repeat a Group of Commands
To repeat the same group of commands successively, use a loop. Several types of loops are available. Each type gives you a different way to exit the loop, based on a conditional test.
F2 Control Toolbar Menu
To enter most of the loop-related commands, use the Program Editor's F2 Control toolbar menu.
Note: A loop command marks the start of the loop. The corresponding End command marks the end of the loop.
When you select a loop, the loop command and its corresponding End command are inserted at the cursor location.
:For | :EndFor
If the loop requires arguments, the cursor is positioned after the command.
You can then begin entering the commands that will be executed in the loop.
For...EndFor Loops
A For...EndFor loop uses a counter to control the number of times the loop is repeated. The syntax of the For command is:
For(variable, begin, end [, increment])
added to the counter each subsequent time For is executed (If this optional value is omitted, the increment is 1.)
exits the loop when variable exceeds this value
counter value used the first time For is executed
variable used as a counter
Note: The ending value can be less than the beginning value, but the increment must be negative.
When For is executed, the variable value is compared to the end value. If variable does not exceed end, the loop is executed; otherwise, program control jumps to the command following EndFor.
Note: The For command automatically increments the counter variable so that the program can exit the loop after a certain number of repetitions.
i > 5 i ≤ 5
:For i,0,5,1 : : :EndFor :
At the end of the loop (EndFor), program control jumps back to the For command, where variable is incremented and compared to end.
Chapter 17: Programming 297

For example:
Tip: You can declare the counter variable as local (pages 288 and 290) if it does not need to be saved after the program stops.
Displays 0, 1, 2, 3, 4, and 5. Displays 6. When variable increments to 6, the loop is not executed.
:For i,0,5,1 : Disp i :EndFor :Disp i
While...EndWhile Loops
A While...EndWhile loop repeats a block of commands as long as a specified condition is true. The syntax of the While command is:
While condition
When While is executed, the condition is evaluated. If condition is true, the loop is executed; otherwise, program control jumps to the command following EndWhile.
Note: The While command does not automatically change the condition. You must include commands that allow the program to exit the loop.
At the end of the loop (EndWhile), program control jumps back to the While command, where condition is re-evaluated.
To execute the loop the first time, the condition must initially be true.
- Any variables referenced in the condition must be set before the While command. (You can build the values into the program or prompt the user to enter the values.)
- The loop must contain commands that change the values in the condition, eventually causing it to be false. Otherwise, the condition is always true and the program cannot exit the loop (called an infinite loop).
For example:
Initially sets x. Displays 0, 1, 2, 3, and 4. Increments x. Displays 5. When x increments to 5, the loop is not executed.
:0→x :While x<5 : Disp x : x+1→x :EndWhile :Disp x
298 Chapter 17: Programming


Loop...EndLoop Loops
A Loop...EndLoop creates an infinite loop, which is repeated endlessly. The Loop command does not have any arguments.
:Loop : -------- : -------- :EndLoop :--------
Typically, the loop contains commands that let the program exit from the loop. Commonly used commands are: If, Exit, Goto, and Lbl (label). For example:
:0➔x :Loop : Disp x : x+1➔x : If x>5 : Exit :EndLoop ;Disp x
An If command checks the condition. Exits the loop and jumps to here when x increments to 6.
Note: The Exit command exits from the current loop.
In this example, the If command can be anywhere in the loop.
The If command could also use a Goto command to transfer program control to a specified Lbl (label) command.
Repeating a Loop Immediately
The Cycle command immediately transfers program control to the next iteration of a loop (before the current iteration is complete). This command works with For...EndFor, While...EndWhile, and Loop...EndLoop.
Lbl and Goto Loops
Although the Lbl (label) and Goto commands are not strictly loop commands, they can be used to create an infinite loop. For example:
:Lbl START : -------- : -------- :Goto START :--------
As with Loop...EndLoop, the loop should contain commands that let the program exit from the loop.
Chapter 17: Programming 299


Configuring the TI-89 / TI-92 Plus
Programs can contain commands that change the configuration of the TI-89 / TI-92 Plus. Because mode changes are particularly useful, the Program Editor’s Mode toolbar menu makes it easy to enter the correct syntax for the setMode command.
Configuration Commands
Note: The parameter/mode strings used in the setMode( ), getMode( ), setGraph( ), and setTable( ) functions do not translate into other languages when used in a program. See Appendix D.
| Command | Description |
|---|---|
| getConfg | Returns a list of calculator characteristics. |
| getFold | Returns the name of the current folder. |
| getMode | Returns the current setting for a specified mode. |
| getUnits | Returns a list of default units. |
| setFold | Sets the current folder. |
| setGraph | Sets a specified graph format (Coordinates, Graph Order, etc.). |
| setMode | Sets any mode except Current Folder. |
| setTable | Sets a specified table setup parameter (tblStart, Δtbl, etc.) |
| setUnits | Sets default units for displayed results. |
| switch | Sets the active window in a split screen, or returns the number of the active window. |
Entering the SetMode Command
Note: The Mode menu does not let you set the Current Folder mode. To set this mode, use the setFold command.
In the Program Editor:
- Position the cursor where you want to insert the setMode command.
- Press:
- TI-89: [2nd] [F6]
- TI-92 Plus: [F6]
to display a list of modes.
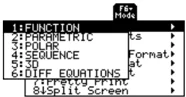
- Select a mode to display a menu of its valid settings.
- Select a setting.
The correct syntax is inserted into your program. :setMode("Graph","FUNCTION")
300 Chapter 17: Programming
Getting Input from the User and Displaying Output
Although values can be built into a program (or stored to variables in advance), a program can prompt the user to enter information while the program is running. Likewise, a program can display information such as the result of a calculation.
F3 I/O Toolbar Menu
To enter most of the commonly used input/output commands, use the Program Editor's F3 I/O toolbar menu.
To see a submenu that lists additional commands, select 1:Dialog.
Input Commands
Chapter 17: Programming 301


