Output Commands
Note: In a program, simply performing a calculation does not display the result. You must use an output command.
| Command | Description |
|---|---|
| ClrIO | Clears the Program I/O screen. |
| Disp | Displays an expression or string on the Program I/O screen. Disp can also display the current contents of the Program I/O screen without displaying additional information. |
| DispG | Displays the current contents of the Graph screen. |
| DispHome | Displays the current contents of the Home screen. |
| DispTbl | Displays the current contents of the Table screen. |
| Output | Displays an expression or string starting at specified coordinates on the Program I/O screen. |
| Format | Formats the way in which numeric information is displayed. |
| Pause | Suspends program execution until the user presses [ENTER]. Optionally, you can display an expression during the pause. A pause lets users read your output and decide when they are ready to continue. |
| Text | Displays a dialog box that contains a specified character string. |
Tip: After Disp and Output, the program immediately continues. You may want to add a Pause command.
Graphical User Interface Commands
Tip: When you run a program that sets up a custom toolbar, that toolbar is still available even after the program has stopped.
Note: Request and Text are stand-alone commands that can also be used outside of a dialog box or toolbar program block.
| Command | Description |
|---|---|
| Dialog...EndDlog | Defines a program block (consisting of Title, Request, etc., commands) that displays a dialog box. |
| Toolbar...EndTbar | Defines a program block (consisting of Title, Item, etc., commands) that replaces the toolbar menus. The redefined toolbar is in effect only while the program is running and only until the user selects an item. Then the original toolbar is redisplayed. |
| CustmOn...CustmOff | Activates or removes a custom toolbar. |
| Custom...EndCustm | Defines a program block that displays a custom toolbar when the user presses [2nd] [CUSTOM]. That toolbar remains in effect until the user presses [2nd] [CUSTOM] again or changes applications. |
| DropDown | Displays a drop-down menu within a dialog box. |
| Item | Displays a menu item for a redefined toolbar. |
| Request | Creates an input box within a dialog box. |
| Text | Displays a character string within a dialog box. |
| Title | Displays the title of a dialog box or a menu title within a toolbar. |
302 Chapter 17: Programming
Creating a Custom Menu
The TI-89 / TI-92 Plus custom menu feature lets you create your own toolbar menu. A custom menu can contain any available function, instruction, or set of characters. The TI-89 / TI-92 Plus has a default custom menu that you can modify or redefine.
Turning the Custom Menu On and Off
Note: When the custom menu is turned on, it replaces the normal toolbar menu. Unless a different custom menu has been created, the default custom menu is displayed.
When you create a custom menu, you can let the user turn it on and off manually, or you can let a program turn it on and off automatically.
| To: | Do this: |
|---|---|
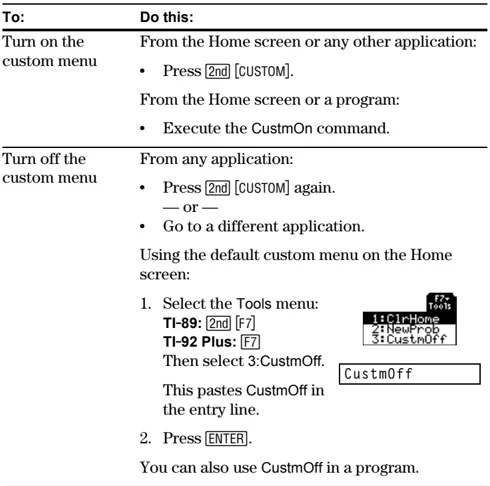
| Turn on the custom menu | From the Home screen or any other application:• Press [2nd] [CUSTOM].From the Home screen or a program:• Execute the CustmOn command. |
| Turn off the custom menu | From any application:• Press [2nd] [CUSTOM] again.— or —• Go to a different application. |
Using the default custom menu on the Home screen:
- Select the Tools menu:TI-89: [2nd] [F7]TI-92 Plus: [F7]Then select 3:CustmOff.This pastes CustmOff in the entry line.
- Press [ENTER].
You can also use CustmOff in a program.
Defining a Custom Menu
Note: When the user selects a menu item, the text defined by that Item command is pasted to the current cursor location.
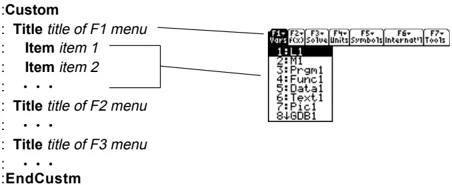
To create a custom menu, use the following general structure.
:Custom : Title title of F1 menu : Item item 1 : Item item 2 : . . . : Title title of F2 menu : . . . : Title title of F3 menu : . . . :EndCustm
Chapter 17: Programming 303
Note: The following may be slightly different than the default custom menu on your calculator.
Note: See how "_o\C" and "_o\F" display as °C and °F in the menu. Similarly, see the international accented characters.
For example:
:Custom
:Title "Vars"
:L1:Item "M1":Item "Prgm1":Item "Func1":Item "Data1"
:Text1:Item "Pic1":Item "GDB1":Item "Str1"
:Title "f(x)"
:Item "f(x)":Item "g(x)":Item "f(x,y)":Item "g(x,y)"
:Item "f(x+h)":Item "Define f(x) ="
:Title "Solve"
:Item "Solve(":Item " and ":Item "{x,y}"
:Item "Solve( and ,(x,y))"
:Title "Units"
:Item "_m/_s^2":Item "_ft/_s^2":Item "_m":Item "ft":Item ""
:Item "_gal":Item "_o\C":Item "_o\F":Item "_kph":Item "_mph"
:Title "Symbols"
:Item "#":Item "\beta":Item "?":Item "~":Item "&"
:Title "Internat'l"
:Item "\e"":Item "\e'":Item "\e^"":Item "\a`"
:Item "\u"":Item "\u^"":Item "\o^":Item "\c," :Item "\u..
:Title "Tools"
:Item "ClrHome":Item "NewProb":Item "CustmOff"
:EndCustm
:CustmOn
Note: This inserts all the commands on a single line. You do not need to split them into separate lines.
To modify the default custom menu, use 3:Restore custom default (as described below) to get the commands for the default menu. Copy those commands, use the Program Editor to create a new program, and paste them into the blank program. Then modify the commands as necessary.
You can create and use only one custom menu at a time. If you need more, write a separate program for each custom menu. Then run the program for the menu you need.
Restoring the Default Custom Menu
To restore the default:
-
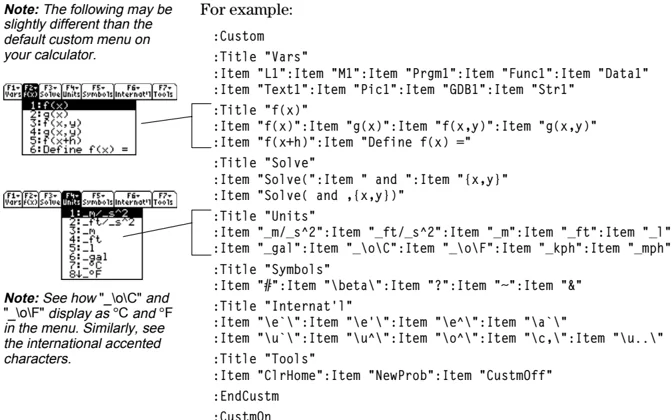
From the Home screen's normal menu (not the custom menu), select Clean Up: TI-89: 2nd F6 TI-92 Plus: F6
-
Select 3:Restore custom default.
This pastes the commands used to create the default menu into the entry line.
- Press ENTER to execute the commands and restore the default.
When you restore the default, any previous custom menu is erased. If the previous menu was created with a program, you can run the program again if you want to reuse the menu later.
304 Chapter 17: Programming
Creating a Table or Graph
To create a table or a graph based on one or more functions or equations, use the commands listed in this section.
Table Commands
Graphing Commands
Chapter 17: Programming 305
Graph Picture and Database Commands
Note: For information about graph pictures and databases, also refer to Chapter 12.
| Command | Description |
|---|---|
| AndPic | Displays the Graph screen and superimposes a stored graph picture by using AND logic. |
| CyclePic | Animates a series of stored graph pictures. |
| NewPic | Creates a graph picture variable based on a matrix. |
| RclGDB | Restores all settings stored in a graph database. |
| RclPic | Displays the Graph screen and superimposes a stored graph picture by using OR logic. |
| RplcPic | Clears the Graph screen and displays a stored graph picture. |
| StoGDB | Stores the current graph settings to a graph database variable. |
| StoPic | Copies the Graph screen (or a specified rectangular portion) to a graph picture variable. |
| XorPic | Displays the Graph screen and superimposes a stored graph picture by using XOR logic. |
306 Chapter 17: Programming
Drawing on the Graph Screen
To create a drawing object on the Graph screen, use the commands listed in this section.
Pixel vs. Point Coordinates
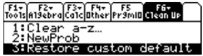
When drawing an object, you can use either of two coordinate systems to specify a location on the screen.
-
Pixel coordinates — Refer to the pixels that physically make up the screen. These are independent of the viewing window because the screen is always:
- TI-89: 159 (0 to 158) pixels wide and 77 (0 to 76) pixels tall.
- TI-92 Plus: 239 (0 to 238) pixels wide and 103 (0 to 102) pixels tall.
-
Point coordinates — Refer to the coordinates in effect for the current viewing window (as defined in the Window Editor).
Pixel coordinates (independent of viewing window)
Point coordinates (for standard viewing window)
Tip: For information about pixel coordinates in split screens, refer to Chapter 14.
Note: Pixel commands start with Pxl, such as PxlChg.
Many drawing commands have two forms: one for pixel coordinates and one for point coordinates.
Erasing Drawn Objects
| Command | Description |
|---|---|
| ClrDraw | Erases all drawn objects from the Graph screen. |
Drawing a Point or Pixel
| Command | Description |
|---|---|
| PtChg or PxlChg | Toggles (inverts) a pixel at the specified coordinates. PtChg, which uses point coordinates, affects the pixel closest to the specified point. If the pixel is off, it is turned on. If the pixel is on, it is turned off. |
| PtOff or PxlOff | Turns off (erases) a pixel at the specified coordinates. PtOff, which uses point coordinates, affects the pixel closest to the specified point. |
| PtOn or PxlOn | Turns on (displays) a pixel at the specified coordinates. PtOn, which uses point coordinates, affects the pixel closest to the specified point. |
| PtTest or PxlTest | Returns true or false to indicate if the specified coordinate is on or off, respectively. |
| PtText or PxlText | Displays a character string at the specified coordinates. |
Chapter 17: Programming 307
Drawing Lines and Circles
| Command | Description |
|---|---|
| Circle or PxlCrcI | Draws, erases, or inverts a circle with a specified center and radius. |
| DrawSlp | Draws a line with a specified slope through a specified point. |
| Line or PxlLine | Draws, erases, or inverts a line between two sets of coordinates. |
| LineHorz or PxlHorz | Draws, erases, or inverts a horizontal line at a specified row coordinate. |
| LineTan | Draws a tangent line for a specified expression at a specified point. (This draws the tangent line only, not the expression.) |
| LineVert or PxlVert | Draws, erases, or inverts a vertical line at a specified column coordinate. |
Drawing Expressions
| Command | Description |
|---|---|
| DrawFunc | Draws a specified expression. |
| DrawInv | Draws the inverse of a specified expression. |
| DrawParm | Draws a parametric equation using specified expressions as its x and y components. |
| DrawPol | Draws a specified polar expression. |
| DrwCtour | Draws contours in 3D graphing mode. |
| Shade | Draws two expressions and shades the areas where expression1 < expression2. |
308 Chapter 17: Programming
Accessing Another TI-89/TI-92 Plus, a CBL 2/CBL, or a CBR
If you link two TI-89 / TI-92 Plus calculators (described in Chapter 22), programs on both units can transmit variables between them. If you link a TI-89 / TI-92 Plus to a Calculator-Based Laboratory™ (CBL 2™/CBL™) or a Calculator-Based Ranger™ (CBR™), a program on the TI-89 / TI-92 Plus can access the CBL 2/CBL or CBR.
F3 I/O Toolbar Menu
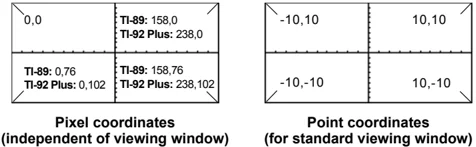
Use the Program Editor’s F3 I/O toolbar menu to enter the commands in this section.
- Press F3 and select 8:Link.
- Select a command.

Accessing Another TI-89 / TI-92 Plus
When two TI-89 / TI-92 Plus calculators are linked, one acts as a receiving unit and the other as a sending unit.
| Command | Description |
|---|---|
| GetCalc | Executed on the receiving unit. Sets up the unit to receive a variable via the I/O port.• After the receiving unit executes GetCalc, the sending unit must execute SendCalc.• After the sending unit executes SendCalc, the sent variable is stored on the receiving unit (in the variable name specified by GetCalc). |
| SendCalc | Executed on the sending unit. Sends a variable to the receiving unit via the I/O port.• Before the sending unit executes SendCalc, the receiving unit must execute GetCalc. |
| SendChat | Executed on the sending unit as a general alternative to SendCalc. Useful if the receiving unit is a TI-92 (or for a generic "chat" program that allows either a TI-92 or TI-92 Plus to be used). |
Note: For a sample program that synchronizes the receiving and sending units so that GetCalc and SendCalc are executed in the proper sequence, refer to “Transmitting Variables under Program Control” in Chapter 22.
Accessing a CBL 2/CBL or CBR
For additional information, refer to the manual that comes with the CBL 2/CBL or CBR unit.
| Command | Description |
|---|---|
| Get | Gets a variable from an attached CBL 2/CBL or CBR and stores it in the TI-89 / TI-92 Plus. |
| Send | Sends a list variable from the TI-89 / TI-92 Plus to the CBL 2/CBL or CBR. |
Chapter 17: Programming 309
Debugging Programs and Handling Errors
After you write a program, you can use several techniques to find and correct errors. You can also build an error-handling command into the program itself.
Run-Time Errors
The first step in debugging your program is to run it. The TI-89 / TI-92 Plus automatically checks each executed command for syntax errors. If there is an error, a message indicates the nature of the error.
• To display the program in the Program Editor, press [ENTER]. The cursor appears in the approximate area of the error.
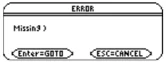
• To cancel program execution and return to the Home screen, press [ESC].
If your program allows the user to select from several options, be sure to run the program and test each option.
Debugging Techniques
Run-time error messages can locate syntax errors but not errors in program logic. The following techniques may be useful.
• During testing, do not use local variables so that you can check the variable values after the program stops. When the program is debugged, declare the applicable variables as local.
• Within a program, temporarily insert Disp and Pause commands to display the values of critical variables. – Disp and Pause cannot be used in a user-defined function. To temporarily change the function into a program, change Func and EndFunc to Prgm and EndPrgm. Use Disp and Pause to debug the program. Then remove Disp and Pause and change the program back into a function.
• To confirm that a loop is executed the correct number of times, display the counter variable or the values in the conditional test.
• To confirm that a subroutine is executed, display messages such as "Entering subroutine" and "Exiting subroutine" at the beginning and end of the subroutine.
Error-Handling Commands
CommandDescription Try...EndTryDefines a program block that lets the program execute a command and, if necessary, recover from an error generated by that command. ClrErrClears the error status and sets the error number in system variable Errornum to zero. PassErrPasses an error to the next level of the Try...EndTry block.
310 Chapter 17: Programming
Example: Using Alternative Approaches
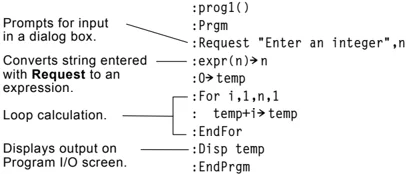
The preview at the beginning of this chapter shows a program that prompts the user to enter an integer, sums all integers from 1 to the entered integer, and displays the result. This section gives several approaches that you can use to achieve the same goal.
Example 1
This example is the program given in the preview at the beginning of the chapter. Refer to the preview for detailed information.
Prompts for input in a dialog box. Converts string entered with Request to an expression. Loop calculation. Displays output on Program I/O screen.
prog1() :Prgm :Request "Enter an integer",n :expr(n)→n :0→temp :For i,1,n,1 : temp+i→temp :EndFor :Disp temp :EndPrgm
Example 2
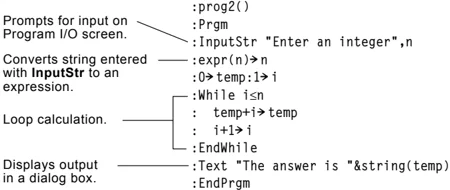
This example uses InputStr for input, a While...EndWhile loop to calculate the result, and Text to display the result.
Prompts for input on Program I/O screen. Converts string entered with InputStr to an expression. Loop calculation. Displays output in a dialog box.
prog2() :Prgm :InputStr "Enter an integer",n :expr(n)→n :0→temp:1→i :While i≤n : temp+i→temp : i+1→i :EndWhile :Text "The answer is "&string(temp) :EndPrgm
Tip: For ≤, type [◄] [0] (zero). For &, press: TI-89: [▲] [×] (times) TI-92 Plus: [2nd] H
Example 3
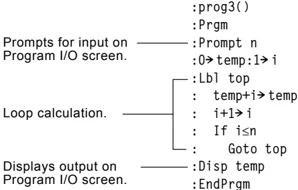
This example uses Prompt for input, Lbl and Goto to create a loop, and Disp to display the result.
Note: Because Prompt returns n as a number, you do not need to use expr to convert n.
Prompts for input on Program I/O screen. Loop calculation. Displays output on Program I/O screen.
prog3() :Prgm :Prompt n :0→temp:1→i :Lbl top : temp+i→temp : i+1→i : If i≤n : Goto top :Disp temp :EndPrgm
Chapter 17: Programming 311
Example 4
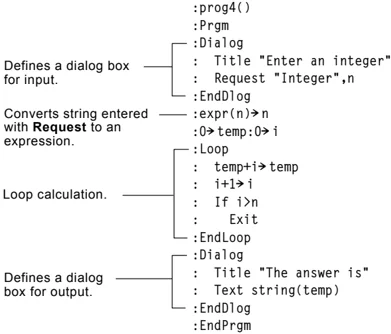
This example uses Dialog...EndDlog to create dialog boxes for input and output. It uses Loop...EndLoop to calculate the result.
:prog4() :Prgm :Dialog : Title "Enter an integer" : Request "Integer",n :EndDlog :expr(n)→n :0→temp:0→i :Loop : temp+i→temp : i+1→i : If i>n : Exit :EndLoop :Dialog : Title "The answer is" : Text string(temp) :EndDlog :EndPrgm
Defines a dialog box for input.
Converts string entered with Request to an expression.
Loop calculation.
Defines a dialog box for output.
Example 5
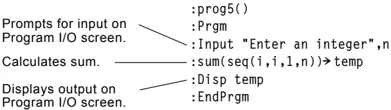
This example uses the TI-89 / TI-92 Plus built-in functions to calculate the result without using a loop.
:prog5() :Prgm :Input "Enter an integer",n :sum(seq(i,i,1,n))→temp :Disp temp :EndPrgm
Prompts for input on Program I/O screen.
Calculates sum.
Displays output on Program I/O screen.
Note: Because Input returns n as a number, you do not need to use expr to convert n.
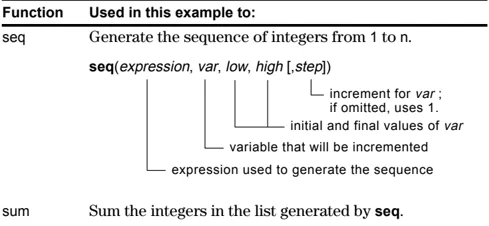
| Function | Used in this example to: |
|---|---|
seq |
Generate the sequence of integers from 1 to n.seq(expression, var, low, high [,step])— expression used to generate the sequence— variable that will be incremented— initial and final values of var— increment for var; if omitted, uses 1. |
sum |
Sum the integers in the list generated by seq. |
312 Chapter 17: Programming
Assembly-Language Programs
You can run programs written for the TI-89 / TI-92 Plus in assembly language. Typically, assembly-language programs run much faster and provide greater control than the keystroke programs that you write with the built-in Program Editor.
Where to Get Assembly-Language Programs
Assembly-language programs, as well as keystroke programs, are available on the Texas Instruments web site at:
education.ti.com
The programs available from this site provide additional functions or features that are not built into the TI-89 / TI-92 Plus. Check the Texas Instruments web site for up-to-date information.
 After downloading a program from the web to your computer, use a TI-GRAPH LINK™ computer-to-calculator cable to send the program to your TI-89 / TI-92 Plus. Refer to the manual that comes with the TI-GRAPH LINK cable.
Note about TI-GRAPH LINK
If you have a TI-GRAPH LINK computer-to-calculator cable and software for the TI-92, be aware that the TI-92 TI-GRAPH LINK software is not compatible with the TI-89 / TI-92 Plus. The cable, however, works with both units. For information about obtaining TI™ Connect or TI-GRAPH LINK software or a TI-GRAPH LINK cable, check the Texas Instruments web site at education.ti.com or contact Texas Instruments as described in Appendix C of this guidebook.
Running an Assembly-Language Program
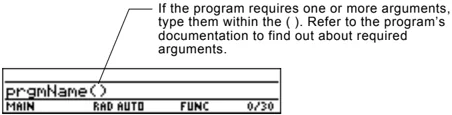
After a TI-89 / TI-92 Plus assembly-language program is stored on your unit, you can run the program from the Home screen just as you would any other program.
Tip: If the program is not in the current folder, be sure to specify the pathname.
If the program requires one or more arguments, type them within the ( ). Refer to the program's documentation to find out about required arguments.
You can call an assembly-language program from another program as a subroutine, delete it, or use it the same as any other program.
Chapter 17: Programming 313
Shortcuts to Run a Program
Note: The programs must be stored in the MAIN folder. Also, you cannot use a shortcut to run a program that requires an argument.
On the Home screen, you can use keyboard shortcuts to run up to nine user-defined or assembly-language programs. However, the programs must have the following names.
| On Home screen, press: | To run a program, if any, named: |
|---|---|
| ◀ 1 | kbdprgm1() |
| : | : |
| ◀ 9 | kbdprgm9() |
If you have a program with a different name and you would like to run it with a keyboard shortcut, copy or rename the existing program to kbdprgm1(), etc.
You Cannot Edit an Assembly-Language Program
You cannot use your TI-89 / TI-92 Plus to edit an assembly-language program. The built-in Program Editor will not open assembly-language programs.
Displaying a List of Assembly-Language Programs
To list the assembly-language programs stored in memory:
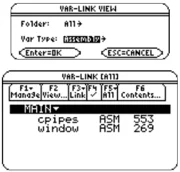
- Display the VAR-LINK screen (2nd [VAR-LINK]).
- Press F2 View.
- Select the applicable folder (or All folders) and set Var Type = Assembly.
- Press ENTER to display the list of assembly-language programs.
Note: Assembly-language programs have an ASM data type.
For Information about Writing an Assembly-Language Program
Note: You must use a computer to write assembly-language programs. You cannot create assembly-language programs from the calculator keyboard.
The information required to teach a novice programmer how to write an assembly-language program is beyond the scope of this book. However, if you have a working knowledge of assembly language, please check the Texas Instruments web site (education.ti.com) for specific information about how to access TI-89 / TI-92 Plus features.
The TI-89 / TI-92 Plus also includes an Exec command that executes a string consisting of a series of Motorola 68000 op-codes. These codes act as another form of an assembly-language program. Check the Texas Instruments web site for available information.
Warning: Exec gives you access to the full power of the microprocessor. Please be aware that you can easily make a mistake that locks up the calculator and causes you to lose your data. We suggest you make a backup of the calculator contents before attempting to use the Exec command.
314 Chapter 17: Programming
Text Editor
18
- Preview of Text Operations ........ 316
- Starting a Text Editor Session ........ 317
- Entering and Editing Text ........ 319
- Entering Special Characters ........ 324
- Entering and Executing a Command Script ........ 328
- Creating a Lab Report ........ 330
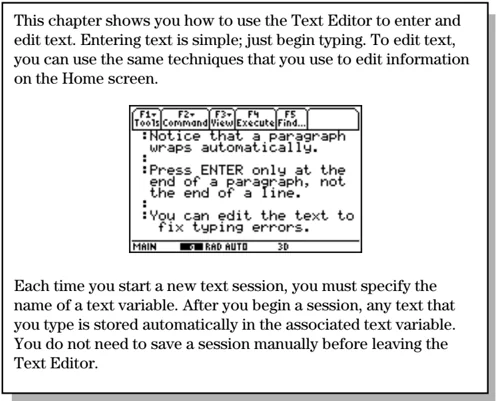
This chapter shows you how to use the Text Editor to enter and edit text. Entering text is simple; just begin typing. To edit text, you can use the same techniques that you use to edit information on the Home screen.

Each time you start a new text session, you must specify the name of a text variable. After you begin a session, any text that you type is stored automatically in the associated text variable. You do not need to save a session manually before leaving the Text Editor.
Chapter 18: Text Editor 315

Preview of Text Operations
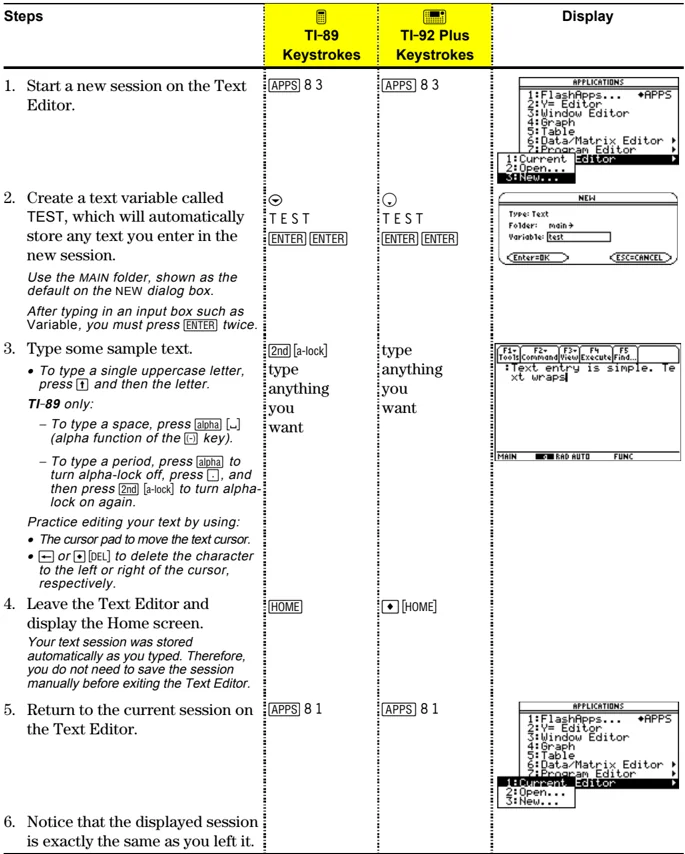
Start a new Text Editor session. Then practice using the Text Editor by typing whatever text you want. As you type, practice moving the text cursor and correcting any typos you may enter.
| Steps | TI-89 Keystrokes | TI-92 Plus Keystrokes | Display |
|---|---|---|---|
| 1. Start a new session on the Text Editor. | APPS 8 3 |
APPS 8 3 |
|
2. Create a text variable called TEST, which will automatically store any text you enter in the new session.Use the MAIN folder, shown as the default on the NEW dialog box.After typing in an input box such as Variable, you must press ENTER twice. |
T E S TENTER ENTER |
T E S TENTER ENTER |
|
3. Type some sample text.• To type a single uppercase letter, press ↑ and then the letter.TI-89 only:– To type a space, press alpha ← (alpha function of the (-) key).– To type a period, press alpha to turn alpha-lock off, press ., and then press 2nd [a-lock] to turn alpha-lock on again.Practice editing your text by using:• The cursor pad to move the text cursor.• ← or ♦ [DEL] to delete the character to the left or right of the cursor, respectively. |
2nd [a-lock]typeanythingyouwant |
typeanythingyouwant | |
| 4. Leave the Text Editor and display the Home screen.Your text session was stored automatically as you typed. Therefore, you do not need to save the session manually before exiting the Text Editor. | HOME |
♦ [HOME] |
|
| 5. Return to the current session on the Text Editor. | APPS 8 1 |
APPS 8 1 |
|
| 6. Notice that the displayed session is exactly the same as you left it. |
316 Chapter 18: Text Editor
Starting a Text Editor Session
Each time you start the Text Editor, you can start a new text session, resume the current session (the session that was displayed the last time you used the Text Editor), or open a previous session.
Starting a New Session
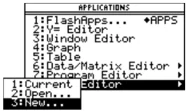
- Press \boxedAPPS and then select 8:Text Editor.
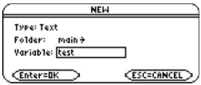
- Select 3:New. The NEW dialog box is displayed.
- Specify a folder and text variable that you want to use to store the new session.
Item Description Type Automatically set as Text and cannot be changed. Folder Shows the folder in which the text variable will be stored. For information about folders, refer to Chapter 5. To use a different folder, press \oplus to display a menu of existing folders. Then select a folder. Variable Type a variable name. If you specify a variable that already exists, an error message will be displayed when you press \boxedENTER. When you press \boxedESC or \boxedENTER to acknowledge the error, the NEW dialog box is redisplayed.
- Press \boxedENTER (after typing in an input box such as Variable, you must press \boxedENTER twice) to display an empty Text Editor screen.
Note: Your session is saved automatically as you type. You do not need to save a session manually before leaving the Text Editor, starting a new session, or opening a previous one.
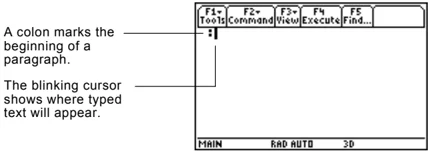
A colon marks the beginning of a paragraph. The blinking cursor shows where typed text will appear.
You can now use the Text Editor as described in the remaining sections of this chapter.
Chapter 18: Text Editor 317
Resuming the Current Session
You can leave the Text Editor and go to another application at any time. To return to the session that was displayed when you left the Text Editor, press [APPS] 8 and select 1:Current.
Starting a New Session from the Text Editor
To leave the current Text Editor session and start a new one:
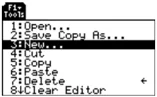
- Press [F1] and select 3:New.
- Specify a folder and text variable for the new session.
- Press [ENTER] twice.
Opening a Previous Session
You can open a previous Text Editor session at any time.
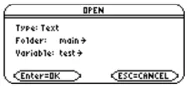
- From within the Text Editor, press [F1] and select 1:Open. — or — From any application, press [APPS] 8 and select 2:Open.
Note: By default, Variable shows the first existing text variable in alphabetic order. 2. Select the applicable folder and text variable. 3. Press [ENTER].
Copying a Session
In some cases, you may want to copy a session so that you can edit the copy while retaining the original.
- Display the session you want to copy.
- Press [F1] and select 2:Save Copy As.
- Specify the folder and text variable for the copied session.
- Press [ENTER] twice.
Note about Deleting a Session
Because all Text Editor sessions are saved automatically, you can accumulate quite a few previous sessions, which take up memory storage space.
To delete a session, use the VAR-LINK screen ( [2nd] [VAR-LINK] ) to delete that session's text variable. For information about VAR-LINK, refer to Chapter 21.
318 Chapter 18: Text Editor
Entering and Editing Text
After beginning a Text Editor session, you can enter and edit text. In general, use the same techniques that you have already used to enter and edit information on the Home screen's entry line.
Typing Text
When you create a new Text Editor session, you see an empty screen. When you open a previous session or return to the current session, you see the existing text for that session.
Note: Use the cursor pad to scroll through a session or position the text cursor.
Tip: Press 2nd \blacktriangle or 2nd \blacktriangledown to scroll up or down one screen at a time, and \blacktriangleleft \blacktriangleright or \blacktriangleleft \blacktriangleright to go to the top or bottom of the text session.
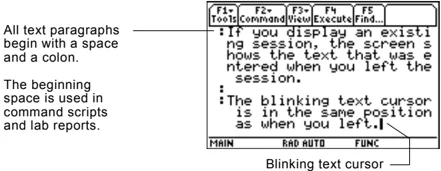
All text paragraphs begin with a space and a colon.
The beginning space is used in command scripts and lab reports.
Blinking text cursor
Tip: If you have a TI-GRAPH LINK™ cable, you can use a computer keyboard to type lengthy text and then send it to the calculator. Refer to page 322.
You do not need to press [ENTER] at the end of each line. At the end of a line, the next character you type wraps to the next line. Press [ENTER] only when you want to start a new paragraph.
As you reach the bottom of the screen, previous lines scroll off the top of the screen.
Typing Alphabetic Characters
Note: On the TI-89, you do not need [alpha] or alpha-lock to type x, y, z, or t. But you must use [↑] or uppercase ALPHA-lock for X, Y, Z, or T.
Note: On the TI-89, alpha-lock is always turned off when you change applications, such as going from the Text Editor to the Home screen.
Typing Alphabetic Characters (continued)
On the TI-89, while either type of alpha-lock is on:
- To type a period, comma, or other character that is the primary function of a key, you must turn alpha-lock off.
- To type a second function character such as
2nd[, you do not need to turn alpha-lock off. After you type the character, alpha-lock remains on.
Deleting Characters
| To delete: | Press: |
|---|---|
| The character to the left of the cursor | ← or F1 7 |
| The character to the right of the cursor | ▶ [DEL] (same as ▶ ←) |
| All characters to the right of the cursor through the end of the paragraph | CLEAR |
| All characters in the paragraph (regardless of the cursor’s position in that paragraph) | CLEAR CLEAR |
Note: If there are no characters to the right of the cursor, CLEAR erases the entire paragraph.
Highlighting Text
| To: | Do this: |
|---|---|
| Highlight text | 1. Move the cursor to the beginning or end of the text.2. Hold ↑ and press: - ◀ or ▶ to highlight characters to the left or right of the cursor, respectively. - ▽ or △ to highlight all characters up to the cursor position on the next or previous line, respectively. |
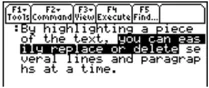
Tip: To remove highlighting without replacing or deleting, move the cursor.
Replacing or Deleting Highlighted Text
| To: | Do this: |
|---|---|
| Replace highlighted text | Type the new text. |
| Delete highlighted text | Press ←. |
320 Chapter 18: Text Editor
Cutting, Copying, and Pasting Text
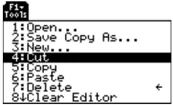
Cutting and copying both place highlighted text into the clipboard of the TI-89 / TI-92 Plus. Cutting deletes the text from its current location (used to move text) and copying leaves the text.
- Highlight the text you want to move or copy.
- Press [F1].
- Select the applicable menu item.
- To move the text, select 4:Cut.
- — or —
- To copy the text, select 5:Copy.
- Move the text cursor to the location where you want to insert the text.
- Press [F1] and then select 6:Paste.
You can use this general procedure to cut, copy, and paste text:
- Within the same text session.
- From one text session to another. After cutting or copying text in one session, open the other session and then paste the text.
- From a text session to a different application. For example, you can paste the text into the Home screen’s entry line.
Tip: You can press:
- TI-89: [♦] [CUT], [♦] [COPY], [♦] [PASTE]
- TI-92 Plus: [♦] X, [♦] C, [♦] V to cut, copy, and paste without having to use the [F1] toolbar menu.
Finding Text
From the Text Editor:
- Place the text cursor at any location preceding the text you want to search for. All searches start at the current cursor location.
- Press [F5].
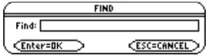
- Type the search text. The search is not case sensitive. For example: CASE, case, and Case have the same effect.
- Press [ENTER] twice.
Tip: The FIND dialog box retains the last search text you entered. You can type over it or edit it.
| If the search text is: | The cursor: |
|---|---|
| Found | Moves to beginning of the search text. |
| Not found | Does not move. |
Chapter 18: Text Editor 321
Inserting or Overtyping a Character
By default, the TI-89 / TI-92 Plus is in insert mode. To toggle between insert and overtype mode, press [2nd] [INS].
| If the TI-89 / TI-92 Plus is in: | The next character you type: |
|---|---|
| Insert modeThin cursor between characters | Will be inserted at the cursor. |
| Overtype modeCursor highlights a character | Will replace the highlighted character. |
Tip: Look at the shape of the cursor to see if you’re in insert or overtype mode.
Clearing the Text Editor
To erase all existing paragraphs and display an empty text screen, press [F1] and then select 8:Clear Editor.
Using a Computer and TI-GRAPH LINK to Enter Text
If you have an optional TI-GRAPH LINK™ computer-to-calculator cable and software for the TI-89 / TI-92 Plus, you can use the computer keyboard to type a text file and then send that file to the TI-89 / TI-92 Plus. This is useful if you need to create a lengthy text file.
For information about obtaining a TI-GRAPH LINK cable and software or upgrading your existing TI™ Connect or TI-GRAPH LINK software for use with the TI-89 / TI-92 Plus, check the TI web site at:
education.ti.com
or contact Texas Instruments as described in Appendix C.
For complete instructions on how to create a text file on a computer and send it to your calculator, refer to the manual that comes with the TI-GRAPH LINK. The general steps are:
- Use the TI-GRAPH LINK software to create a new text file. a. In the software, select New from the File menu. Then select either TI-89 Data File or TI-92 Plus Data File and click OK. An untitled edit window is displayed. b. In the Name box at the top of the edit window, type the name you want to use for the text variable on the TI-89 / TI-92 Plus. Then type the applicable text. c. From the File menu, select Save As. In the dialog box, type a File Name, select Text as the File Type, select a directory, and click OK.
Note: On the calculator, the name of the text variable will be the name you enter in Step 1b, not the file name in Step 1c.
322 Chapter 18: Text Editor
- Use the TI-GRAPH LINK™ software to send the file from the computer to the TI-89 / TI-92 Plus. a. Use the TI-GRAPH LINK cable to connect the computer and the calculator. b. Be sure the TI-89 / TI-92 Plus is on the Home screen. c. In the software, select Send from the Link menu. Select the text file and click Add to add it to the Files Selected list. Then click OK. d. When notified that the sending process is complete, click OK.
- On the TI-89 / TI-92 Plus, use the Text Editor to open the text variable.
Chapter 18: Text Editor 323
Entering Special Characters
You can use the CHAR menu to select any special character from a list. You can also type certain commonly used characters from the keyboard. To see which characters are available from the keyboard, you can display a map that shows the characters and their corresponding keys.
Selecting Characters from the CHAR Menu
- Press [2nd] [CHAR].
- Select the applicable category. A menu lists the characters in that category.
- Select a character. You may need to scroll through the menu.
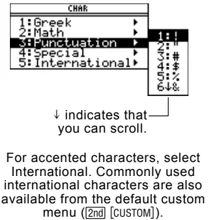
↓ indicates that you can scroll.
For accented characters, select International. Commonly used international characters are also available from the default custom menu ([2nd] [CUSTOM]).
Displaying the Keyboard Map
The keyboard map shows several shortcuts that let you enter certain special characters from the keyboard. It also shows some shortcuts for other calculator features.
The keyboard map does not display all available shortcuts. Refer to the inside front and the inside back covers of this guidebook for a complete list of shortcut keys.
| On the TI-89: | On the TI-92 Plus: |
|---|---|
| Press [♦] [EE] to display the keyboard map.Press [ESC] to exit the map. | Press [♦] [KEY] to display the keyboard map.Press [ESC] to exit the map. |
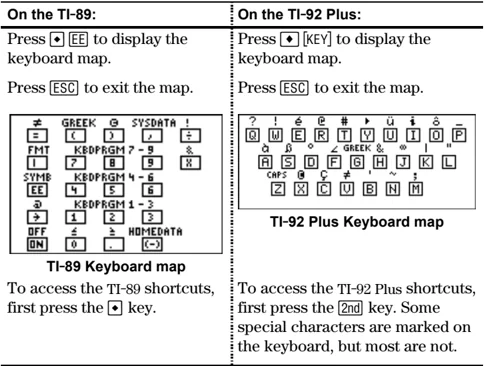
TI-89 Keyboard map
To access the TI-89 shortcuts, first press the [♦] key.
TI-92 Plus Keyboard map
To access the TI-92 Plus shortcuts, first press the [2nd] key. Some special characters are marked on the keyboard, but most are not.
Calculator features accessed from the keyboard map are discussed on the next page.
324 Chapter 18: Text Editor
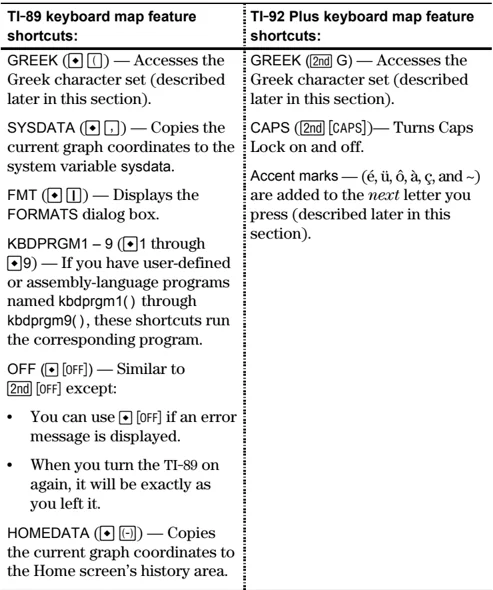
TI-89 keyboard map feature shortcuts:
GREEK (\blacklozenge [1]) — Accesses the Greek character set (described later in this section).
SYSDATA (\blacklozenge [,]) — Copies the current graph coordinates to the system variable sysdata.
FMT (\blacklozenge [1]) — Displays the FORMATS dialog box.
KBDPRGM1 – 9 (\blacklozenge1 through \blacklozenge9) — If you have user-defined or assembly-language programs named kbdprgm1() through kbdprgm9(), these shortcuts run the corresponding program.
OFF (\blacklozenge [OFF]) — Similar to [2nd] [OFF] except:
- You can use \blacklozenge [OFF] if an error message is displayed.
- When you turn the TI-89 on again, it will be exactly as you left it.
HOMEDATA (\blacklozenge [-]) — Copies the current graph coordinates to the Home screen’s history area.
TI-92 Plus keyboard map feature shortcuts:
GREEK ([2nd] G) — Accesses the Greek character set (described later in this section).
CAPS ([2nd] [CAPS])— Turns Caps Lock on and off.
Accent marks — (é, ï, ô, à, ç, and ~) are added to the next letter you press (described later in this section).
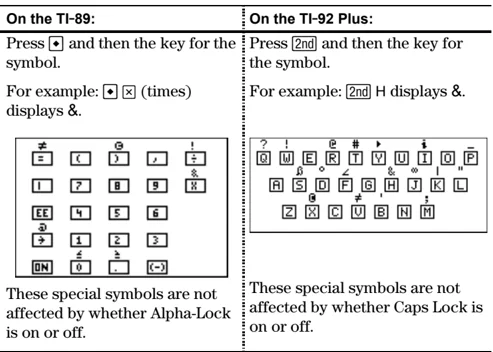
Typing Special Symbols from the Keyboard
On the TI-89:
Press \blacklozenge and then the key for the symbol.
For example: \blacklozenge [X] (times) displays &.
These special symbols are not affected by whether Alpha-Lock is on or off.
On the TI-92 Plus:
Press [2nd] and then the key for the symbol.
For example: [2nd] H displays &.
These special symbols are not affected by whether Caps Lock is on or off.
Note: To help you find the applicable keys, these maps show only the special symbols.
Chapter 18: Text Editor 325